Header in Microsoft Word
What Is a Header in Microsoft Word?
A header in Microsoft Word is the information that appears at the top of every page of your document.
In academic writing, the header may contain information such as the title (maybe shortened) of the paper, or chapter, or section.
The content of the header depends on the instructions you have been given. For example, you may have to follow APA style or the Chicago style, or a modified style your instructor has given you.
You may just have one header only (e.g. containing the title and the page number), or several headers (e.g. a different title for every chapter and the page number).
For example, a more complex piece of academic writing, like a thesis, could have the following:
- a Title page with no header
- preliminary pages (Abstract, Acknowledgements, Table of Contents, List of Tables and List of Abbreviations) with different headers in each section
- page numbers in the headers that change from Roman numerals in the preliminary pages, to Arabic numbers in the content pages
- different chapter or section headings in different parts of the academic paper.
For an example of different headers, see this thesis (opens in a new window) submitted at the University of Sydney.
You can easily add, change or delete a header in Microsoft Word. You can easily format different headers in separate parts of your academic paper.
Why Create Headers?
Headers will make your academic writing look more professional and improve your chances of success because:
- headers make it easier for your reader (e.g. your instructor) to find their way around your academic paper.
For example, if reference is made to a page number (e.g. see page 88), they can quickly find that page by looking at the page number in the header. - A header can easily re-orientate a reader.
For example, after reading several pages, a quick look at the title in the header will remind you of what the topic is about. - They make you look professional! Just look at any substantial professional writing—it will have headers.
When to Create a Header or Headers
You will have a header (or headers) because:
- it is a requirement of the academic writing style (e.g. APA, Chicago) you are using and/or
- it is a requirement of your institution's writing style and/or
- your instructor has instructed you to do so.
Failure to follow requirements or instructions could result in a lower grade, or even rejection of your work.
Where to place a header or headers
A header in a Word document is placed at the top of the page.
The header has some reserved space on the top of each page.
To see how much space there is, do the following:
- select the Layout tab from the ribbon
- select Margins from the Page Setup group
You will see the space allocated to the Top (i.e. Header), Bottom (i.e. Footer), Left and Right margins.
The standard Microsoft Word setting is 1 inch or 2.54 cm.
If you wish to vary, you can choose one of the presets (e.g. Narrow, Moderate, Wide, Mirrored) or you can create your own custom margins including the header.
How to Add a Different Header in Word
Your academic writing may have different headers in different parts of the document.
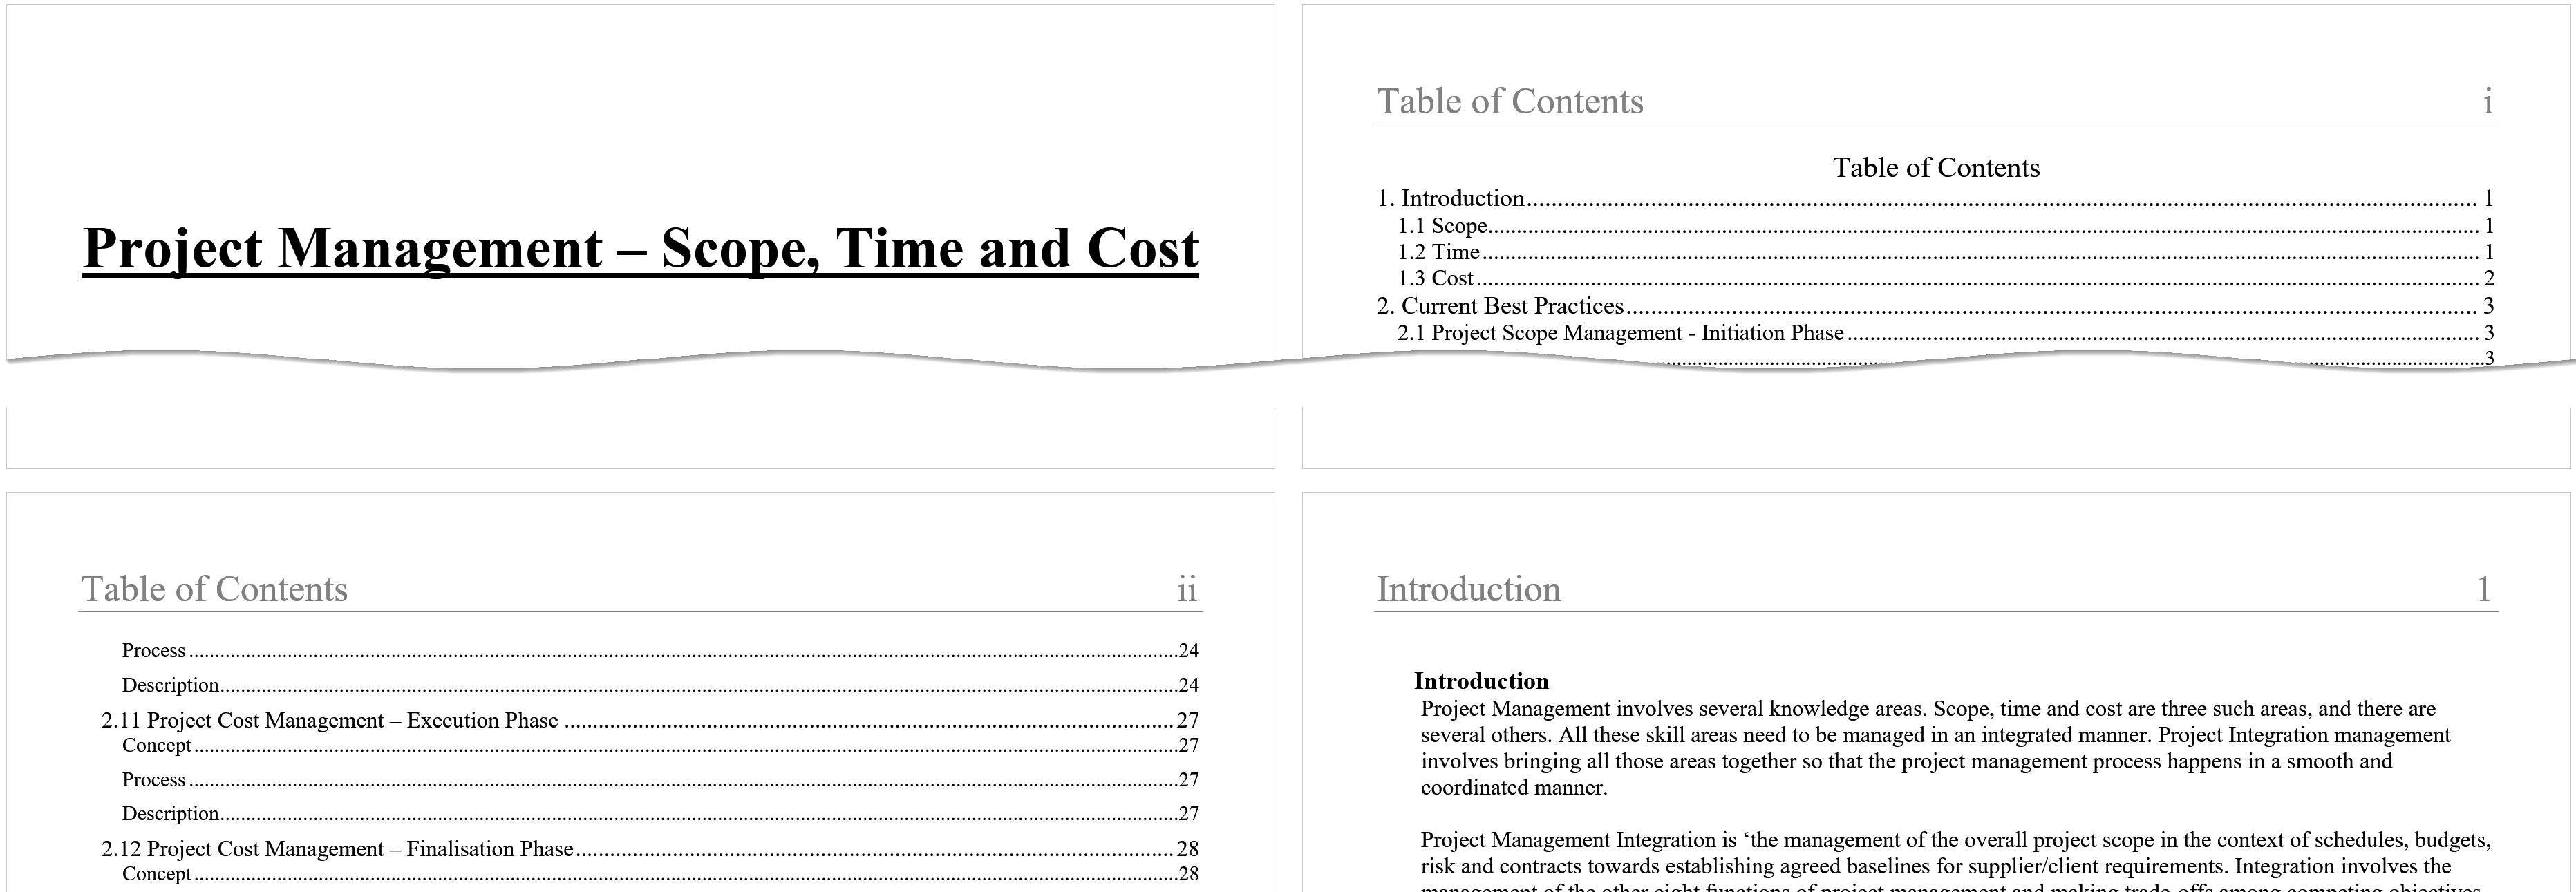
An example in Figure 1 shows:
- a Title page with no header
- a Table of Contents with a header containing "Table of Contents" and Roman numeral page numbers i and ii
- the main text with the header containing the Chapter title and Arabic numeral page number 1
 Figure 1: Example of Different Running Heads in an Academic Paper
To create a different header in Microsoft Word:
- divide your academic paper into sections (each section will have your unique header)
- break the link between the new header and the previous header (remove Link to Previous)
Then add the information you want to the header in each section.
If you need to know how to create sections, see section break in Microsoft word.
The following example shows how to set up the headers in an academic paper (or any other document) that have the following:
- title page (i.e. a cover page)
- prelims (preliminaries) which are the pages before the main text such as
abstract, table of contents, list of figures, list of tables, acknowledgements, declarations - main text.
Note: your document may vary, such as no title page, or different prelims or no prelims.
The principle remains the same - when you want to change the header on the next page:
- insert a section break at the end of the current page
- break the connection between the new header and the previous header (i.e. remove the Link to Previous)
1. Insert a Section Break Between the Title (or Cover) and Preliminary Pages
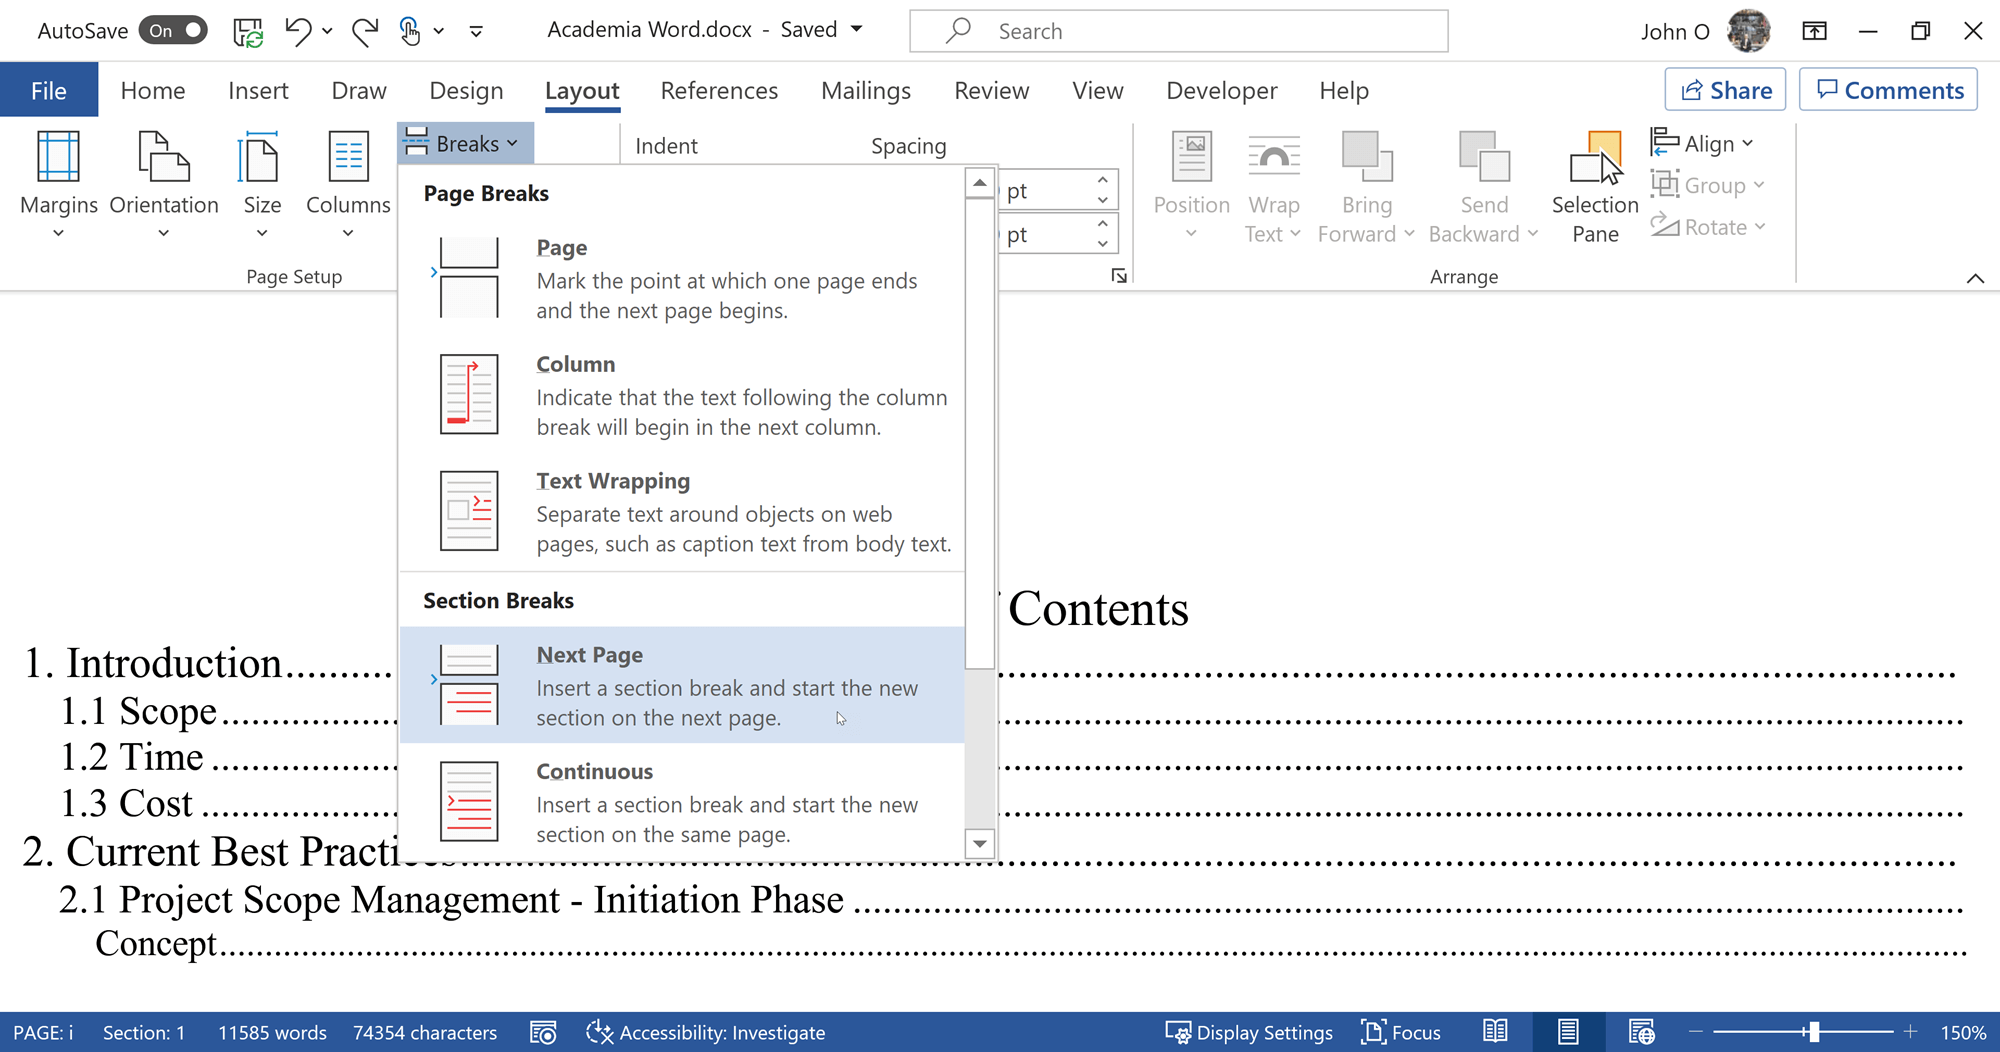
To create a section break at the end of the Title (or Cover) page (See Figure 2):
- select Layout from the ribbon
- select Breaks
- select Next Page
Please note: if you already have a page break at the end of the Title (Cover) page, either:
- delete it or
- insert a Continuous section break.
Otherwise, you will insert an extra blank page.
 Figure 2: Insert a Section Break at the End of the Title (or Cover) Page.
2. Remove the Link Between the Headers
Now you have a header for section 1, and a header for section 2.
Remove the dependencies between the section 1 header and section 2 header as follows:
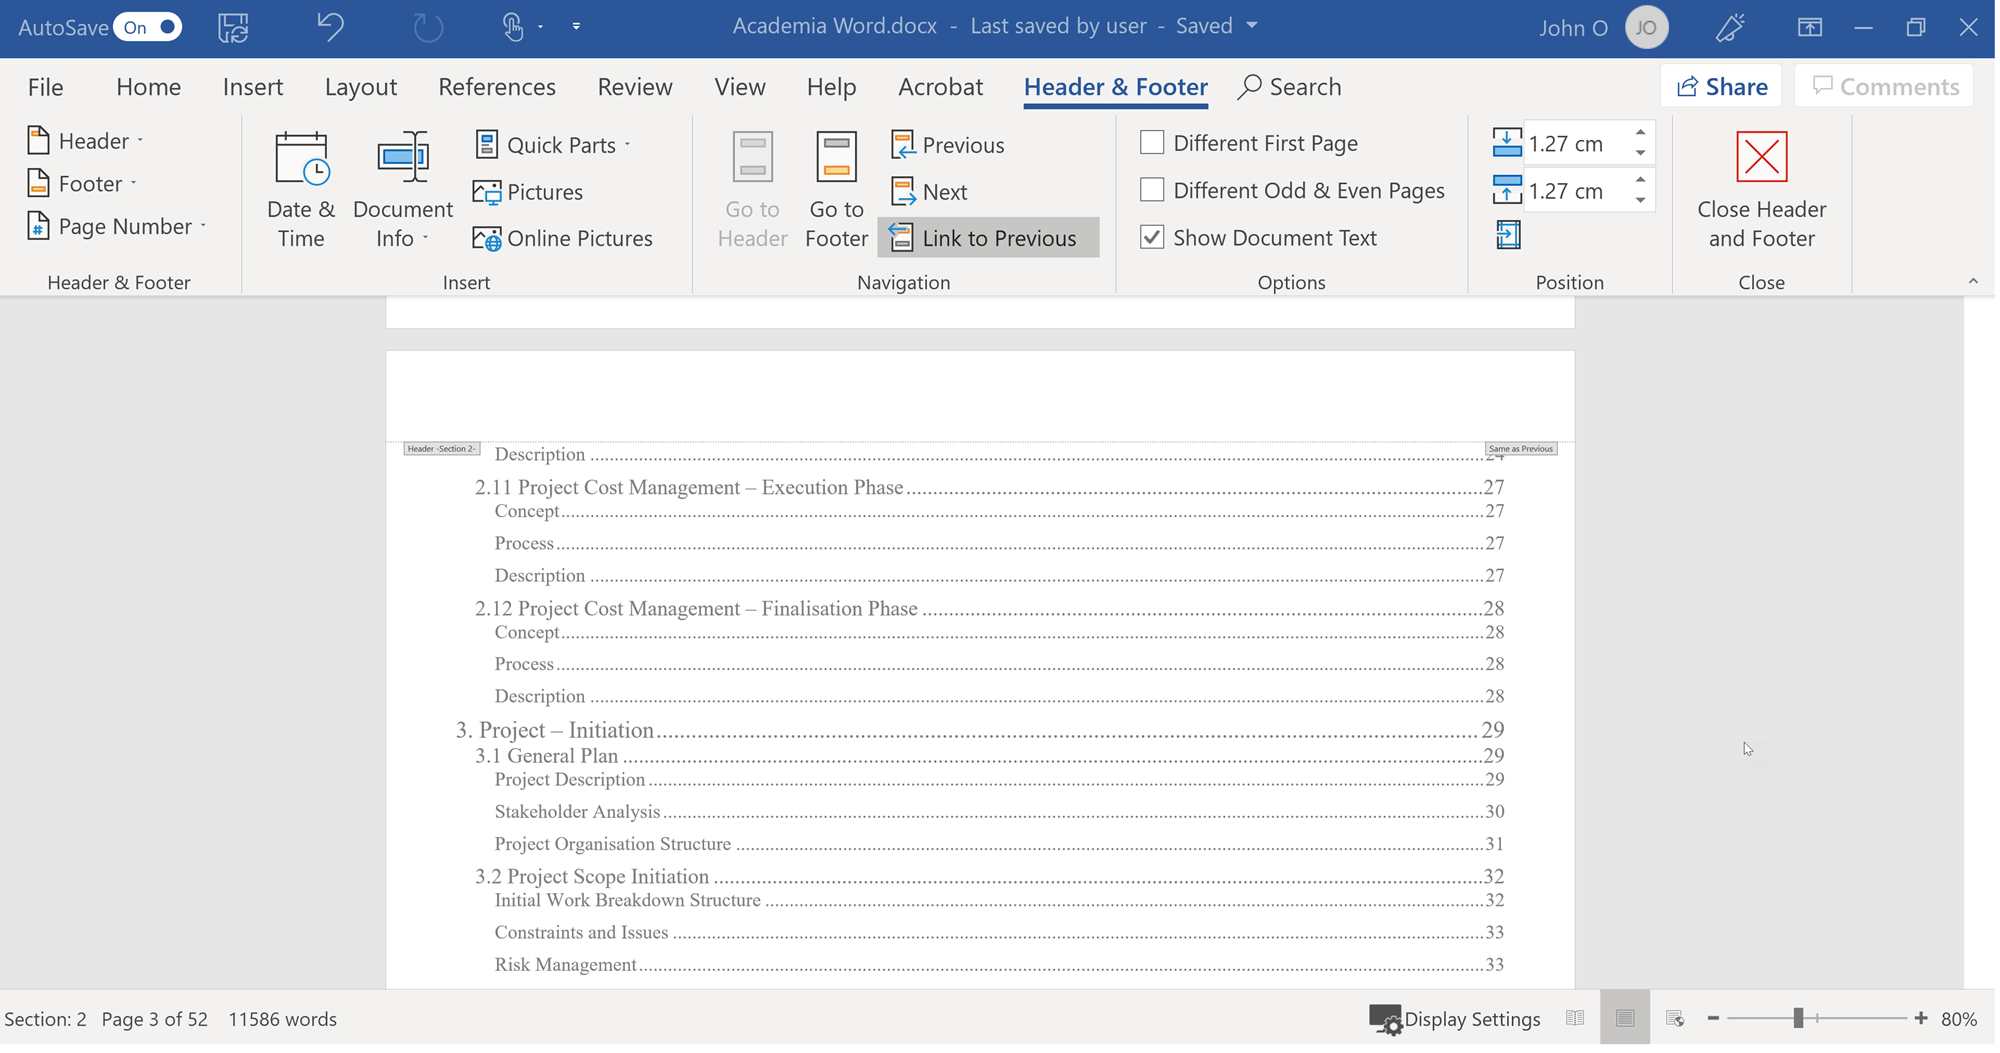
- place your cursor in the header of section 2 (e.g. Table of Contents in Figure 3)
- double click (or tap) in the header section to open the Header & Footer tab
- deselect (click or touch) Link to Previous in the Navigation group
 Figure 3: Remove Linkage Between the Header in the Table of Contents Section and the Title Page Header
Creating Multiple Headers in Complex Documents
Often academic writing (e.g. thesis, dissertations) contains many different sections, each with its own header.
The principle remains the same - insert a Section Break Next Page, then remove Link to Previous.
Consider a thesis that has several sections, with each section having a different header:
|
Title |
No header - Insert Section Break Next Page at the bottom of the page. |
|
Declaration |
Remove Link to Previous (i.e. Section 1) - Enter "Declaration" into the Header - Insert Section Break Next Page at the end of this section. |
|
Abstract |
Remove Link to Previous (i.e. Section 2) - Enter "Abstract" into the Header - Insert Section Break Next Page at the end of this section. |
|
Statement of Contribution |
Remove Link to Previous (i.e. Section 3) - Enter "Statement of Contribution" into the Header - Insert Section Break Next Page at the end of this section. |
|
Acknowledgements |
Remove Link to Previous (i.e. Section 4) - Enter "Acknowledgements" into the Header - Insert Section Break Next Page at the end of this section. |
|
Table of Contents |
Remove Link to Previous (i.e. Section 5) - Enter "Table of Contents" into the Header - Insert Section Break Next Page at the end of this section. |
|
List of Tables |
Remove Link to Previous (i.e. Section 6) - Enter "List of Tables" into the Header - Insert Section Break Next Page at the end of this section. |
|
List of Figures |
Remove Link to Previous (i.e. Section 7) - Enter "List of Figures" into the Header - Insert Section Break Next Page at the end of this section. |
|
List of Abbreviations |
Remove Link to Previous (i.e. Section 8) - Enter "List of Abbreviations" into the Header - Insert Section Break Next Page at the end of this section. |
|
Chapter 1 - Introduction |
Remove Link to Previous (i.e. Section 9) - Enter "Chapter 1 - Introduction" into the Header - Insert Section Break Next Page at the end of this section. |
|
Chapter 2 - Literature Review |
Remove Link to Previous (i.e. Section 10) - Enter "Chapter 2 - Literature Review" into the Header - Insert Section Break Next Page at the end of this section. |
|
Chapter 3 - Method and Results |
Remove Link to Previous (i.e. Section 11) - Enter "Chapter 3 - Method and Results" into the Header - Insert Section Break Next Page at the end of this section. |
|
Chapter 4 - Discussion |
Remove Link to Previous (i.e. Section 12) - Enter "Chapter 4 - Discussion" into the Header - Insert Section Break Next Page at the end of this section. |
|
Chapter 5 - Conclusion |
Remove Link to Previous (i.e. Section 13) - Enter "Chapter 5 - Conclusion" into the Header - Insert Section Break Next Page at the end of this section. |
|
References |
Remove Link to Previous (i.e. Section 14) - Enter "References" into the Header - Insert Section Break Next Page at the end of this section. |
|
Appendix |
Remove Link to Previous (i.e. Section 15) - Enter "Appendix" into the Header - Insert Section Break Next Page at the end of this section. |
This example has shown how easy it is to add a header in Microsoft Word for each section.
No matter how complex your document is, you can easily create different headers.
Summary
Headers in your academic writing improve the professional look of your writing. It also provides a quick reference point for the reader and reminds them of the main topic you are writing about.
Adding one single header in a Word document (starting with page number 1) on the first page is quite easy.
Adding a different header in a Word document requires some extra steps.
These steps are simple to do, and you will make your academic and professional writing so much better.
Like This Page? Please Share It.