- Home
- Table of Contents
How to Create a Table of Contents in APA Format
Creating a table of contents in APA format can be confusing because the APA Style Guide does not provide specific formatting rules for it.
To clarify this, I contacted the American Psychological Association (APA) and asked about formatting a table of contents. Their response was:
The Publication Manual does not include guidelines for tables of contents because APA formatted papers, such as class assignments or journal articles, typically do not require a table of contents. Formatting a table of contents is up to the writer or the institution's requirements.
However, for longer papers like theses, literature reviews, or case studies, a table of contents can help readers navigate to different sections easily.
While you can use the default table of contents settings in Microsoft Word, customizing it ensures consistency with APA formatting. To align the table of contents with APA standards, consider the following:
- Use the same font type and size as the rest of the paper, for example, Times New Roman 12.
- Apply double line spacing to the entries.
Create the table of contents in APA format as follows:
- Prepare for generation of the table of contents
- Understand how the table of contents is generated
- Decide when to set outline levels
- Identify sections to include in the table of contents
- Follow these steps to set outline levels
- Choose where to place the table of contents
- Set up the table of contents in APA format
- Generate the table of contents in APA format
Preparation for the Table of Contents
How the Table of Contents is Generated
The table of contents is created automatically based on the outline levels you assign to your headings.
The outline levels align with APA headings as follows:
- APA Level 1 headings are the main sections of your paper. Set these to Outline Level 1.
- APA Level 2 headings are subsections of APA Level 1 headings. Set these to Outline Level 2.
- APA Level 3 headings are smaller sections under Level 2 headings. Set these to Outline Level 3.
If you need help formatting your headings in APA style, see how to set up your headings in APA format.
By assigning the correct outline levels to your headings, Microsoft Word can organize your paper’s structure into a table of contents (see Figure 1 for example).
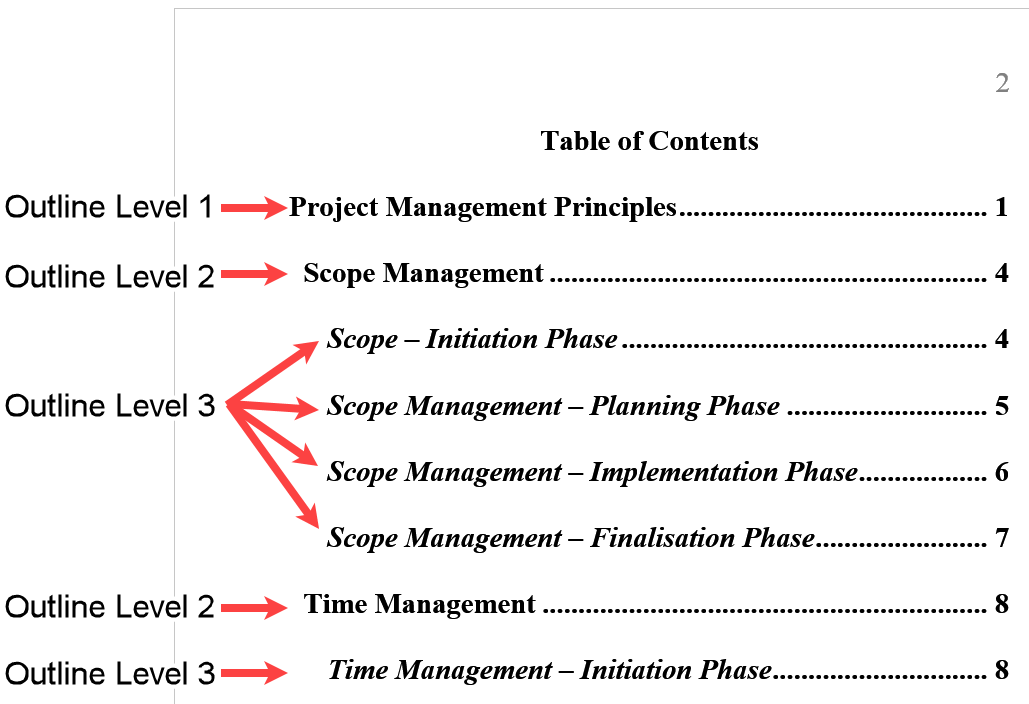 Figure 1: Table of Contents in APA Format With Hierarchy Levels
When to Set Outline Levels
You can set outline levels at any time before generating the table of contents.To save time and ensure accuracy, it’s a good idea to set them as you write.
Key Sections to Include in the TOC
The table of contents provides a clear overview of your document’s structure by listing key sections and headings. It will help your readers easily navigate your paper.
Include the headings of major sections, such as:
- Abstract
- List of figures
- List of tables
- Headings and subheadings from the main text
- References
- Appendices
Do not include the title page or the table of contents itself.
Steps to Set Outline Levels
To assign the correct outline level to your heading in Microsoft Word, follow these steps:
- Select the heading you want to assign an outline level to (see Figure 2).
- Open the Paragraph dialog box.
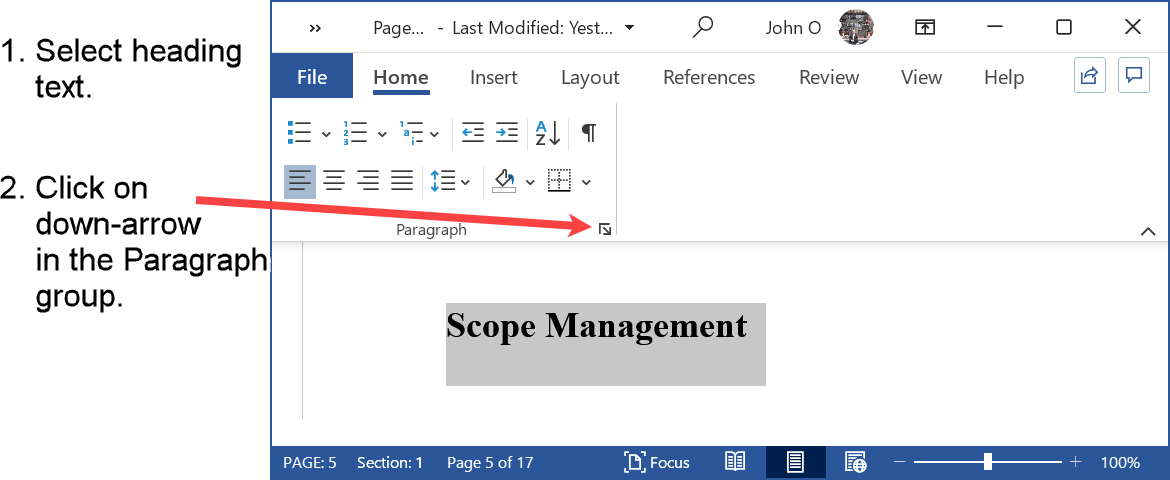 Figure 2: Heading Selected for Assigning an Outline Level
- In the Paragraph dialog box, set the outline level as follows:
- APA Level 1 heading to Outline Level 1
- APA Level 2 heading to Outline Level 2 (example shown in Figure 3)
- APA Level 3 heading to Outline Level 3
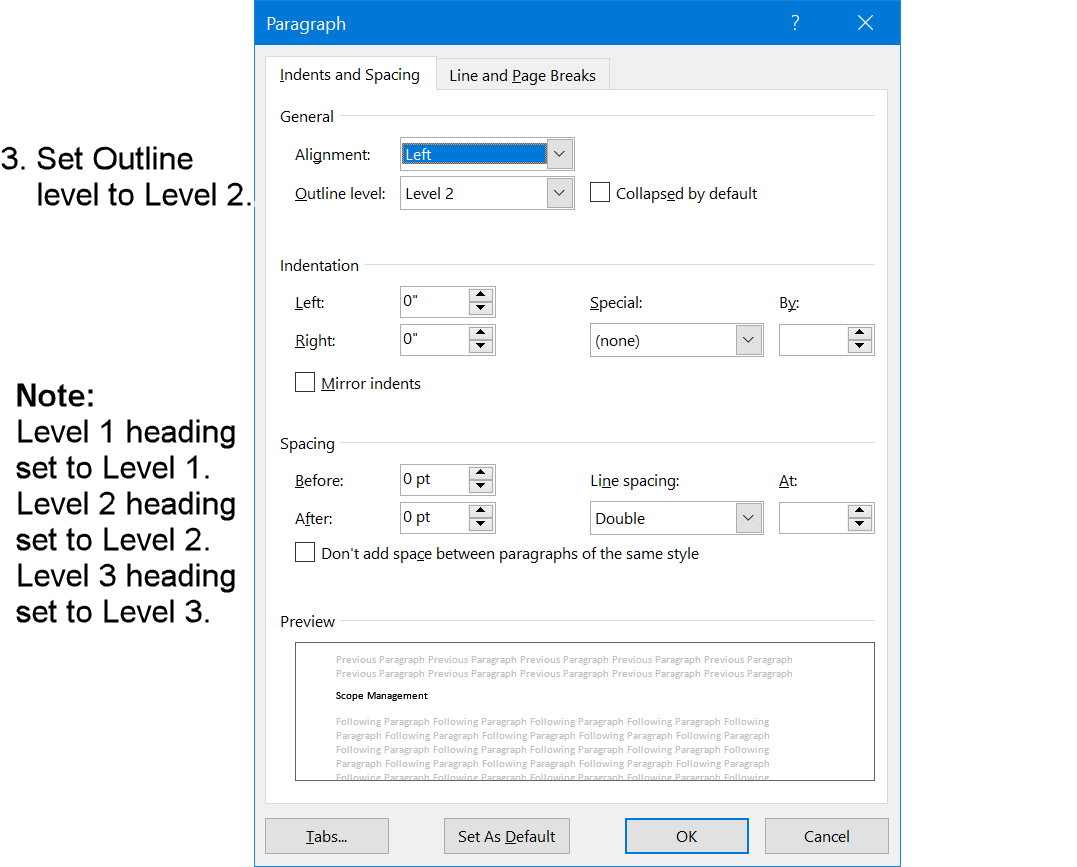 Figure 3: Example - APA Level 2 Heading Set to Outline Level 2
Where to Place the TOC
Place the table of contents after the title page and before the abstract.
This allows readers to quickly understand the structure of the document, read it sequentially, or jump directly to specific sections or headings.
Set Up the Table of Contents in APA Format
Select the Table of Contents Submenu in Microsoft Word
- Select the References tab.
- In the Table of Contents group, select Table of Contents.
- Choose Custom Table of Contents (see Figure 4) to open the Table of Contents dialog box.
This will allow you to modify the table of contents to match APA format.
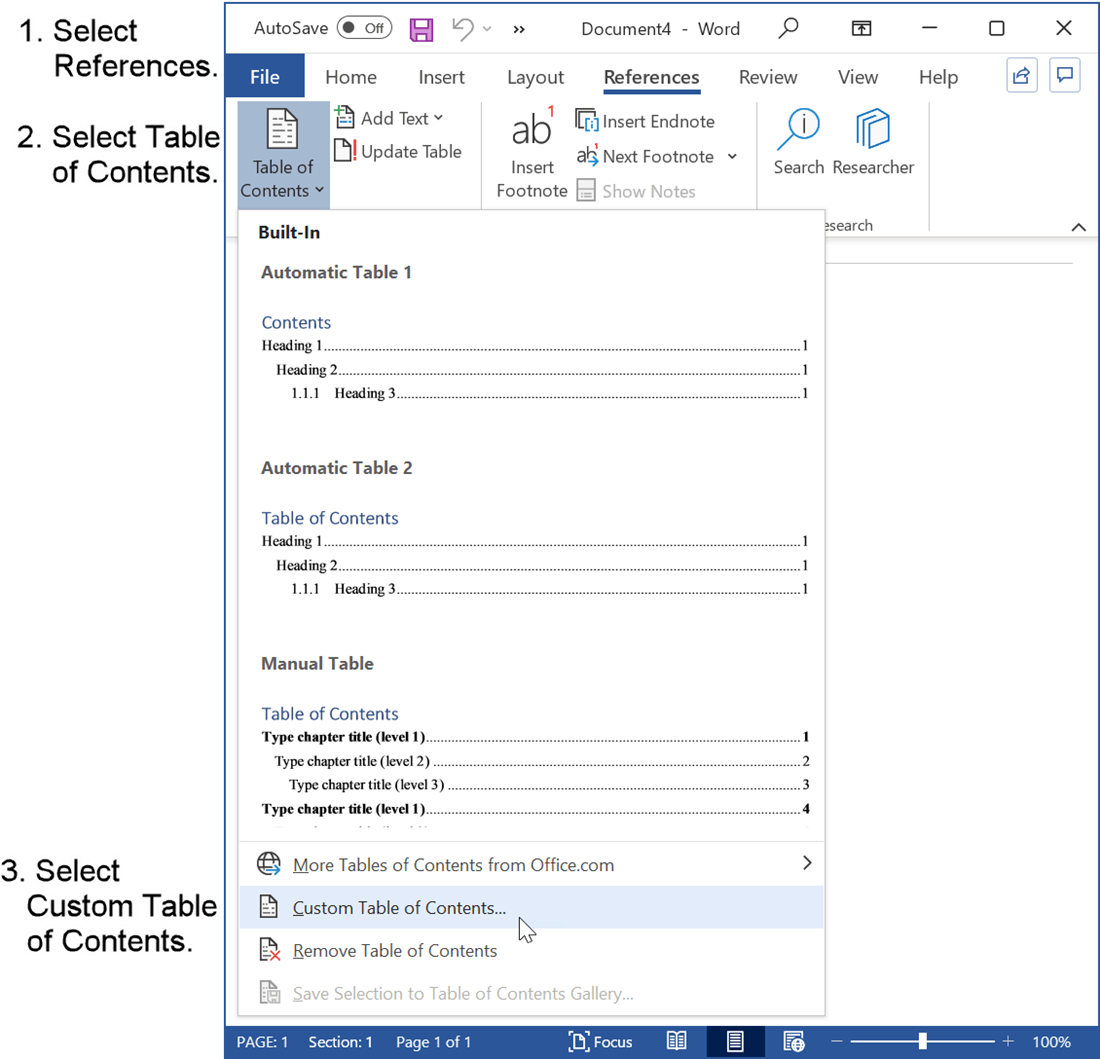 Figure 4: Select Table of Contents Submenu in Microsoft Word
- Select Modify (see Figure 5) to enable you to choose which outline level to modify.
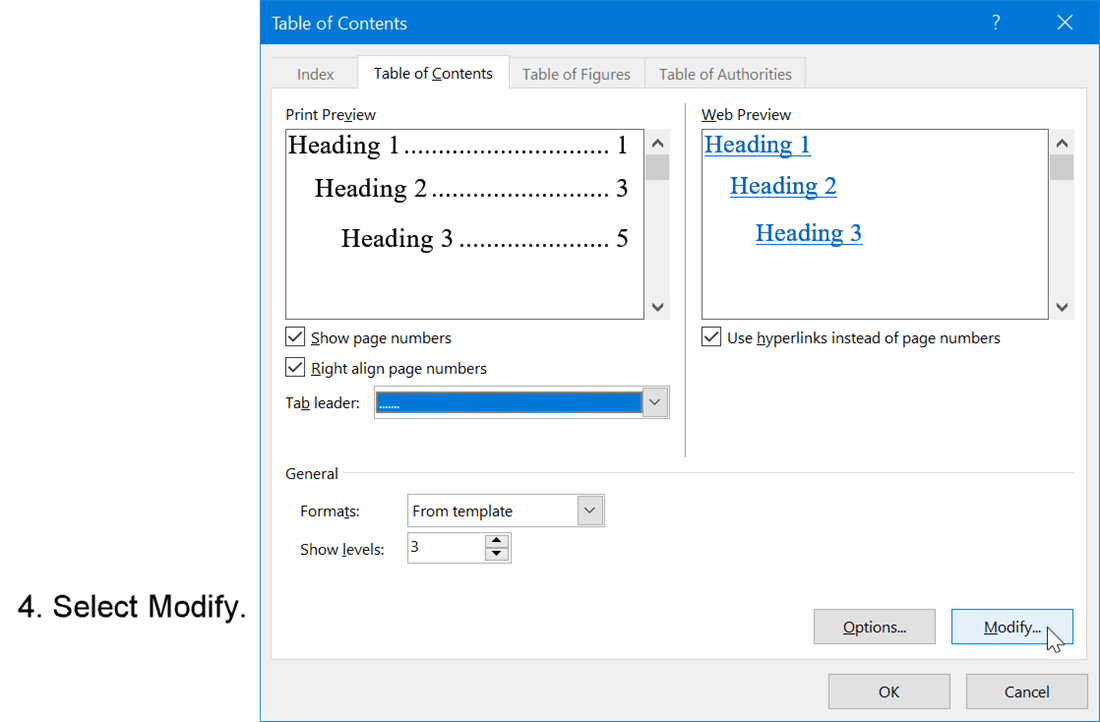 Figure 5: Select Modify in Table of Contents Submenu
- Select the outline level to modify (see Figure 6):
- TOC 1 for APA Level 1 headings
- TOC 2 for APA Level 2 headings
- TOC 3 for APA Level 3 headings
- Select Modify so that you can format the Table of Contents entry in APA format.
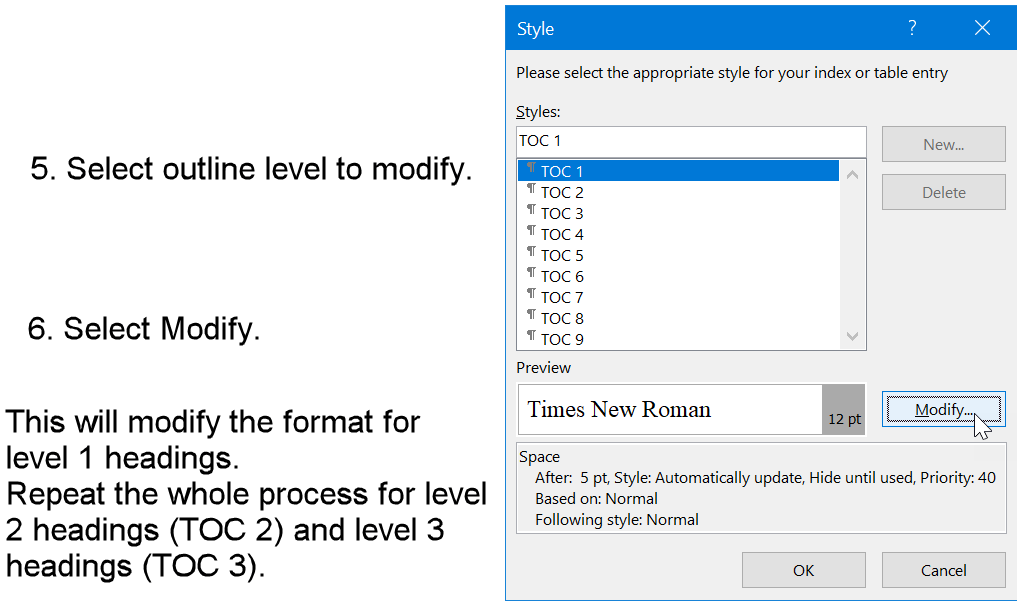 Figure 6: Select Modify for Level 1 Heading
- Select the font type and size for your APA format (see Figure 7).
The font type and size will already be in APA format if it is the default in your Word document. - Select Format to enable you to format Paragraph.
Each entry in the table of contents is a paragraph.
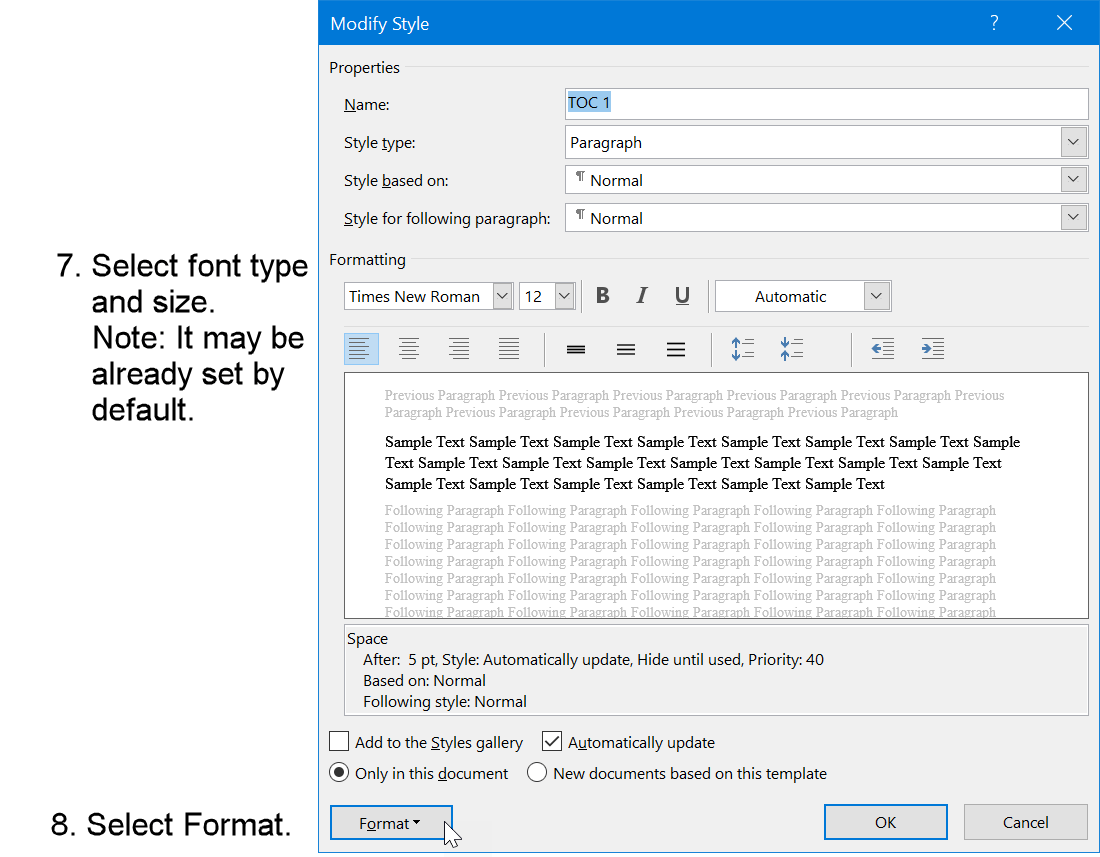 Figure 7: Set APA Font Type and Size for Level 1 Heading
- Select Paragraph to format line spacing (see Figure 8).
 Figure 8: Select paragraph to be formatted in APA style
- Select Double Line spacing (See Figure 9).
Make sure all other settings are as shown, in particular, Before and After spacing is set to zero.
The paragraph style will now be in APA format. - Select OK.
Select OK in all other open dialog boxes.
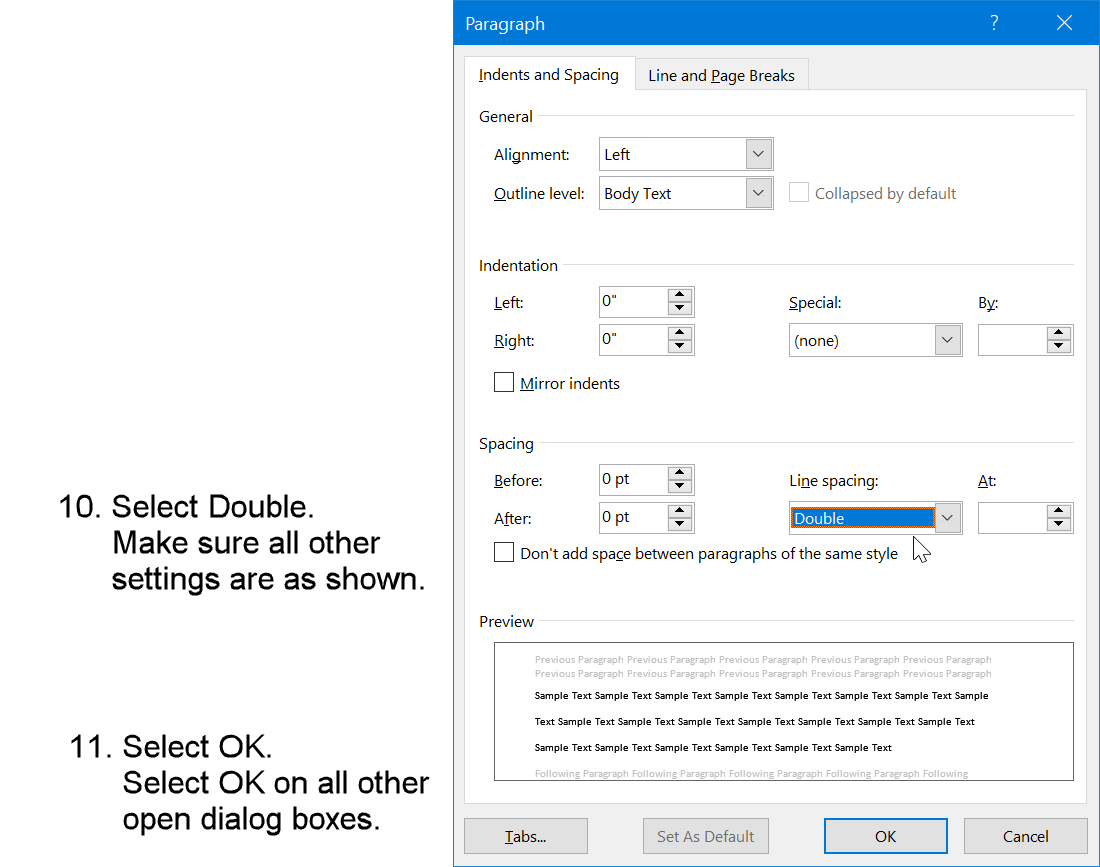 Figure 9: Double Line Spacing for APA Level 1 Headings
Creating a Table of Contents in Microsoft Word in APA Format
Four different formats are shown:
- page number in Arabic numerals (1, 2, 3...) on every page including the title page (see Figure 10)
- page number in Arabic numerals (1, 2, 3...) starting at 1 on the table of contents page (see Figure 11)
- page number in Arabic numerals starting at 1 after the table of contents (see Figure 12)
- Roman numerals (i, ii, iii...) for the table of contents, and Arabic numerals (1, 2, 3...) for the main body of work (see Figure 13)
Table of Contents with a Page Number on Every Page
The most obvious way to create a table of contents in APA format is to treat the table of contents as another page (or pages) of text.
Therefore, the table of contents in APA format (as shown in Figure 10) will:
- have a page number in APA format on every page of the table of contents
- be double line spaced
- have the same font type and size as the rest of the paper
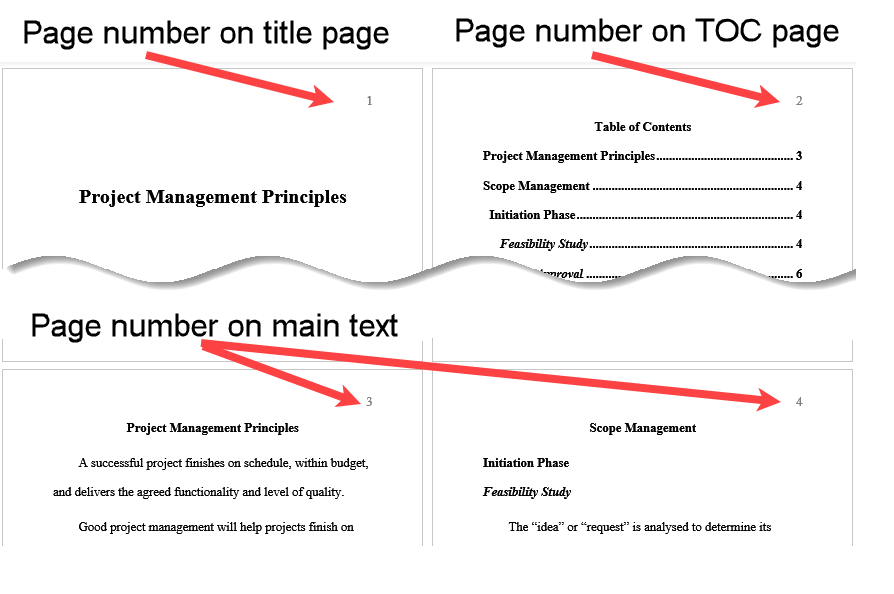 Figure 10: Table of Contents in APA format
See how to build a table of contents with a page number on every page.
Page Number Starting at 1 in the Table of Contents
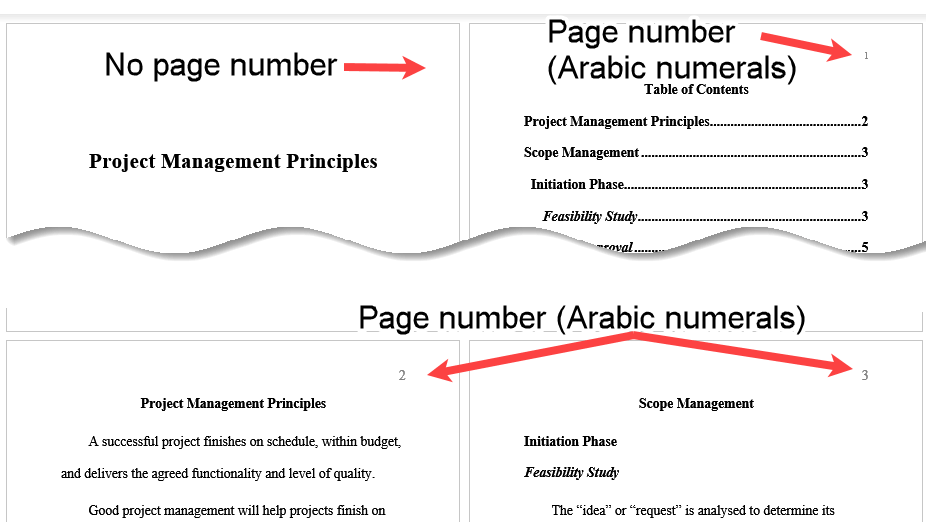 Figure 11: Table of Contents With Page Number 1
See how to build a table of contents starting with page number 1.
Page Number Starting at 1 in the Main Text
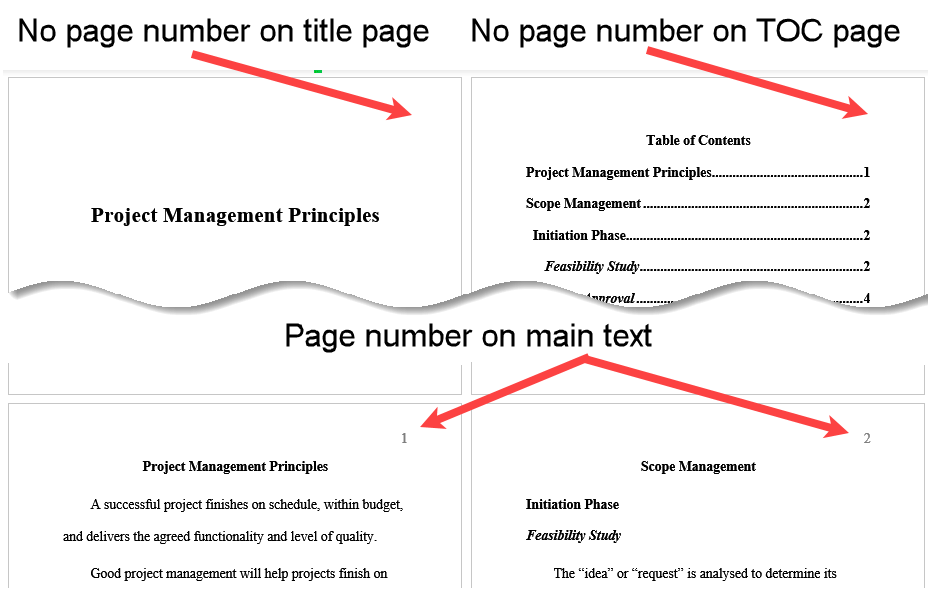 Figure 12. Page Numbering Starting After the Table of Contents
See how to build a table of contents with the page number starting at the main text.
Roman Numerals in the Table of Contents and Arabic Numerals in the Main Text
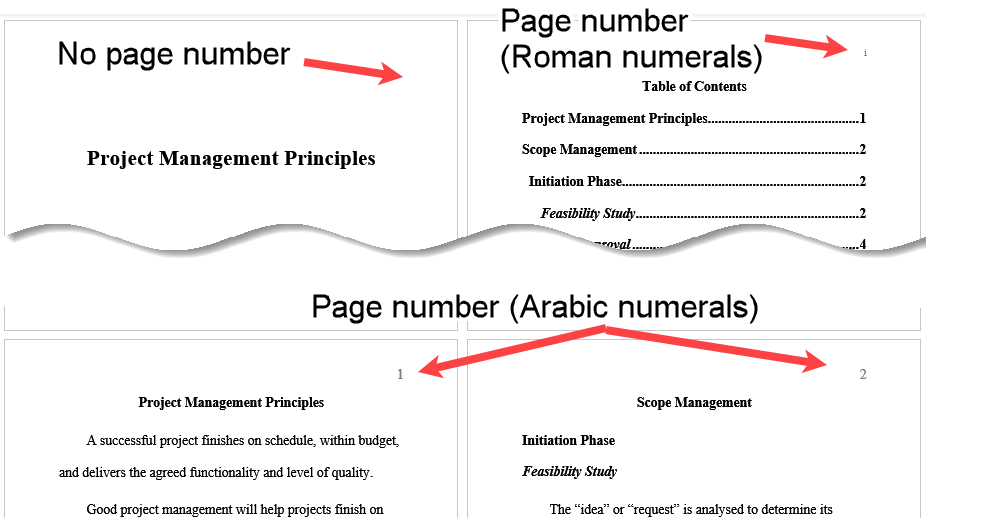 Figure 13: Roman and Arabic Numerals for Page Numbers
See how to build a table of contents with page numbers in Roman numeral format.
Summary
The APA style says nothing about creating a table of contents in APA format. The APA blog will explain why.
However, this does not mean you cannot have one. A table of contents is often required.
The important steps in creating a table of contents in APA format (as described above) are:
- Decide how to format the table of contents - either use the Microsoft table of contents default format or format the table of contents to be consistent with the rest of your paper (same font type and size, double spaced).
- Set outline levels for the headings in your APA formatted document.
- Generate the table of contents after the title page.
You could also manually create a table of contents using a Microsoft Word supplied template.
You should only do this in special cases where the automatically generated table of contents does not satisfy your requirements.
See how to create a manual table of contents in a word document.
Like This Page? Please Share It.