- Home
- Table of Contents
- Table of Contents With No Page Numbers
Create a Table of Contents with No Page Numbers
You can create a table of contents with no page numbers in Microsoft Word.
For example, consider a document with the following structure:
- a title page with no page number
- an abstract page with no page number
- a table of contents with no page numbers
The table of contents could be just one page, or several pages long. - the main text following the table of contents.
The first page of the main text following the table of contents starts with page number 1.
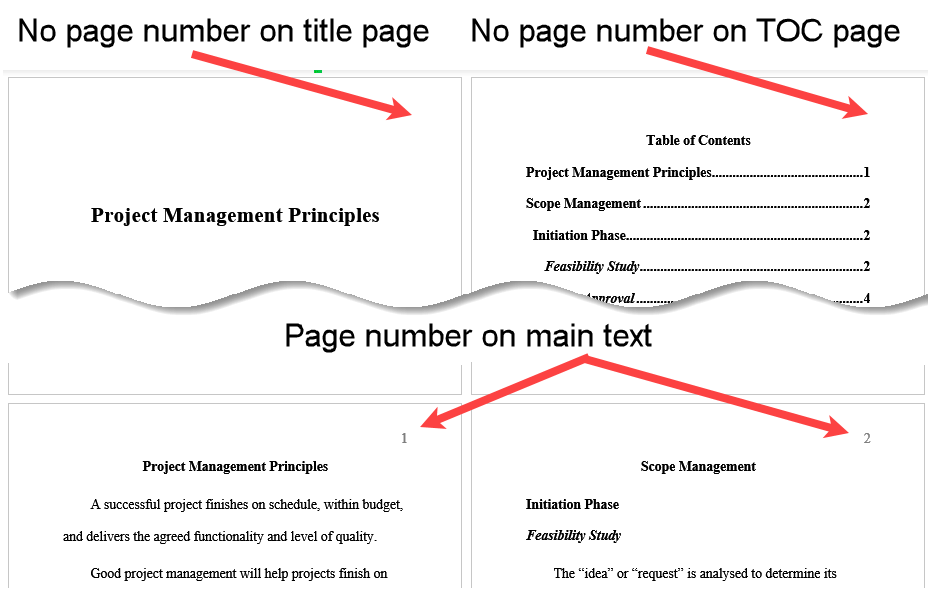 Figure 1: Table of Contents With No Page Number
Figure 1 shows a document with a table of contents with no page number.
There is a title page with no page number. The table of contents also has no page number.
Page numbering begins with the main text. The first page of the main text (Project Management Principles) starts with a page number of 1, the next page number is 2, and so on.
Note: Alternative page numbering options
If you want to start page numbering before the table of contents, see create a table of contents with page numbers.
If you want to start page numbering with the table of contents, see create a table of contents starting with page number 1.
If you want Roman numerals (i, ii, iii, iv...) for page numbers in the table of contents and Arabic numerals (1, 2, 3, 4...) for page numbers in the rest of the document, see create a table of contents with Roman numeral page numbers.
When to Create a Table of Contents
You can create a table of contents anytime you like. But you do need to set your headings in Microsoft Word as follows:
- main headings to Outline level 1.
The level will already be set to 1 if you have used the Heading 1 style from the Styles gallery. - APA Level 2 headings to Outline level 2.
The level will already be set to 2 if you have used the Heading 2 style from the Styles gallery. - APA Level 3 headings to Outline level 3.
The level will already be set to 3 if you have used the Heading 3 style from the Styles gallery.
You can add, change or delete your headings at any time.
Create a Table of Contents
Now you are ready to create a table of contents.
If you have already set up the page numbering to begin at 1 after the table of contents, go to generate the table of contents.
Set Up the Page Numbering
Set up any pages (for example, the title page) before the table of contents and the table of contents to have no page numbers.
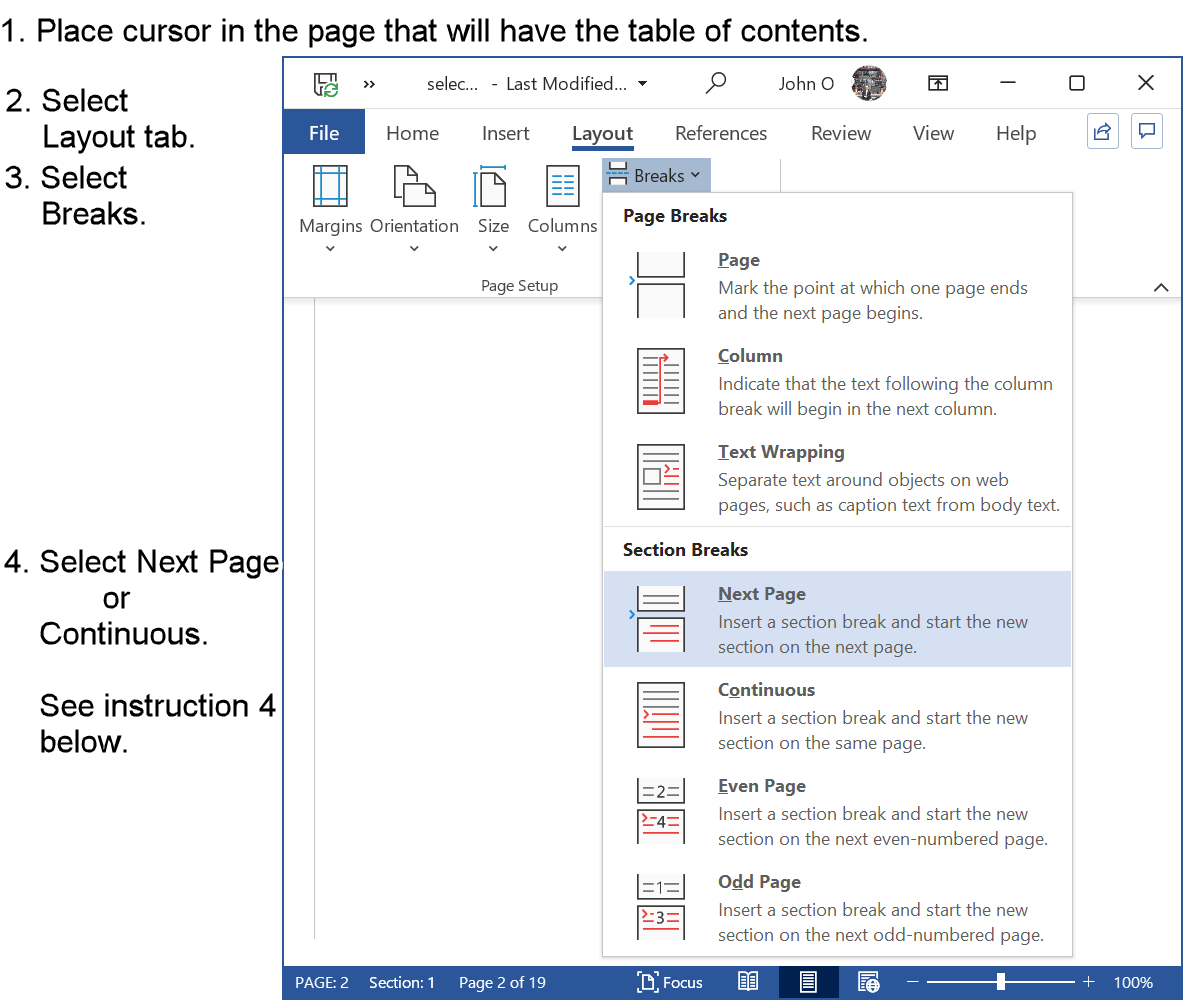 Figure 2: Insert Section Break at End of Table of Contents Page
Figure 2 instructions (if required) are as follows:
- Place the cursor at the end of the table of contents page.
- Select the Layout tab in the ribbon.
- Select Breaks.
- Select Next Page or Continuous.
Next Page will insert a section break and a new page if you have not written any content yet. You are just making room for the table of contents to be inserted later.
Continuous will insert a section break only. This is for when you have already written content.
The title page and the table of contents will be in section 1.
Nothing more needs to be done for these pages. They will not have a page number. The following pages will be in section 2.
Set Up the Subsequent Page Numbers. The page after the table of contents begins with page number 1 (see Figures 3–6).
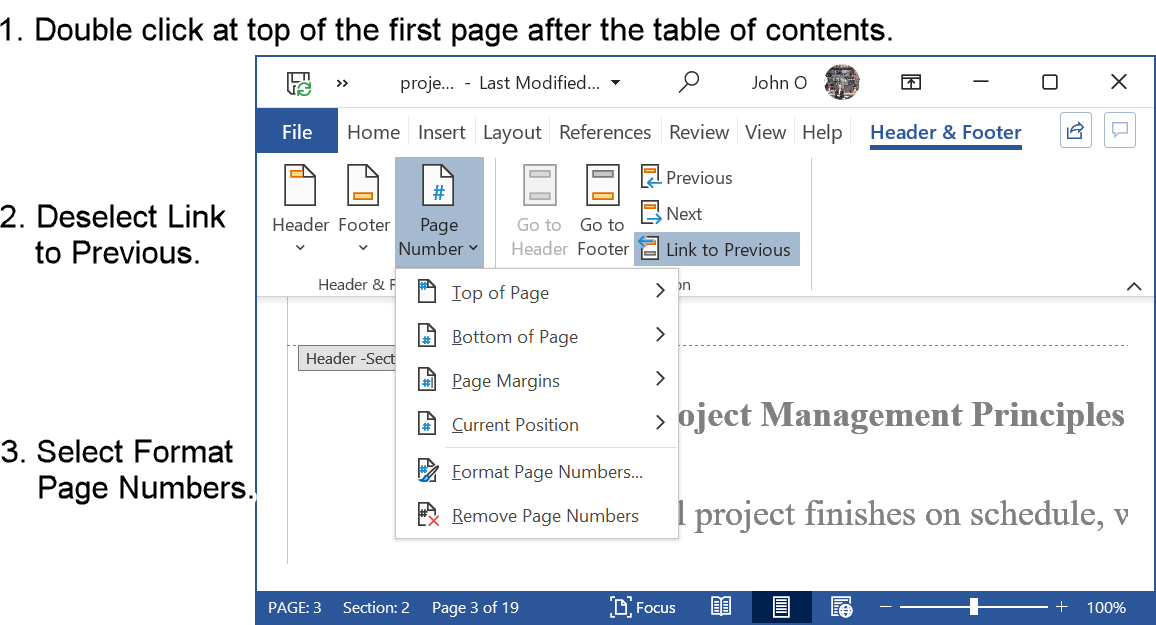 Figure 3: Remove Link From the Table of Contents Header
Figure 3 instructions (if required) are as follows:
- Open the header of the page after the table of contents (click at the top of page).
- Click on Link to Previous.
This breaks the link between the header of the table of contents and the header of the following page.
You need to do this because the headers will be different - the table of contents header will not have a page number, and the pages after will have a page number in the header.
Note: You must have done the steps in Figure 2, that is, created a section 2. If you haven't, the Link to Previous button will be greyed out, and not available. - Select Page Number.
- Select Format Page Numbers.
You will now set the page number on the page after the title page to begin at 1.
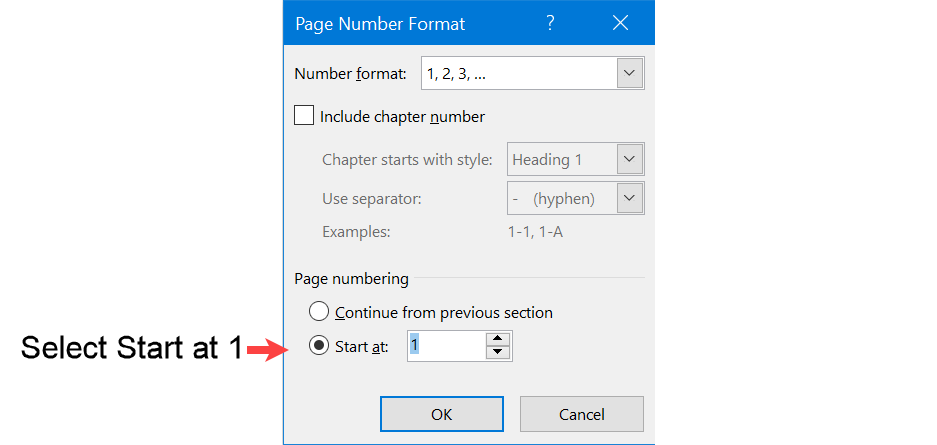 Figure 4: Format Section 2 Header to Start With Page Number 1
Figure 4 instructions (if required) are as follows:
- Select Start at 1.
The page number in section 2 will be formatted to start at 1.
Note: The page number will not yet be inserted. - Select OK.
You will now insert the page number. Figure 5 shows inserting the page number in the header.
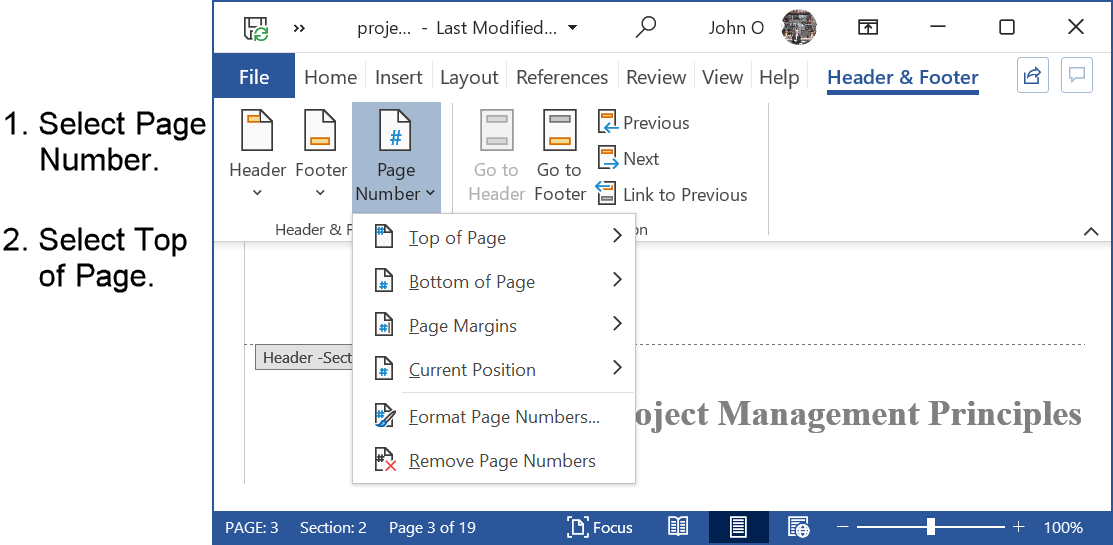 Figure 5: Position Page Number at Top of Page
Figure 5 instructions (if required) are as follows:
- Select Page Number.
A submenu is opened. - Select Top of Page if you want the page number in the header.
Select Bottom of Page if you want the page number in the footer.
Figure 6 shows where to place the page number in the header or footer, for example, aligned against the right margin.
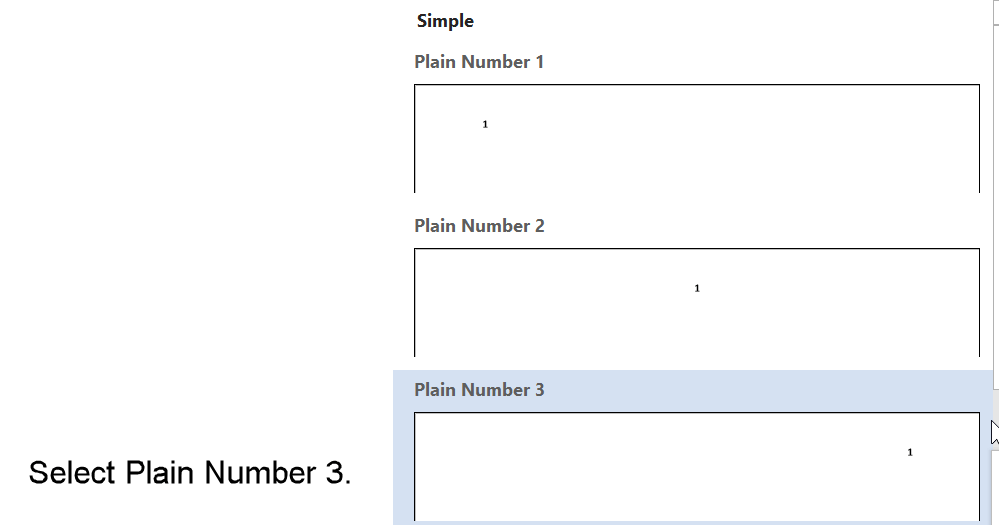 Figure 6: Place Page Number Against the Right Margin for Section 2
Figure 6 instruction (if required) is as follows:
- Select Plain Number 1 to left align.
Select Plain Number 2 to center.
Select Plain Number 3 to right align.
The first page after the table of contents page will start at number 1.
Generate the Table of Contents
You can now generate the table of contents.
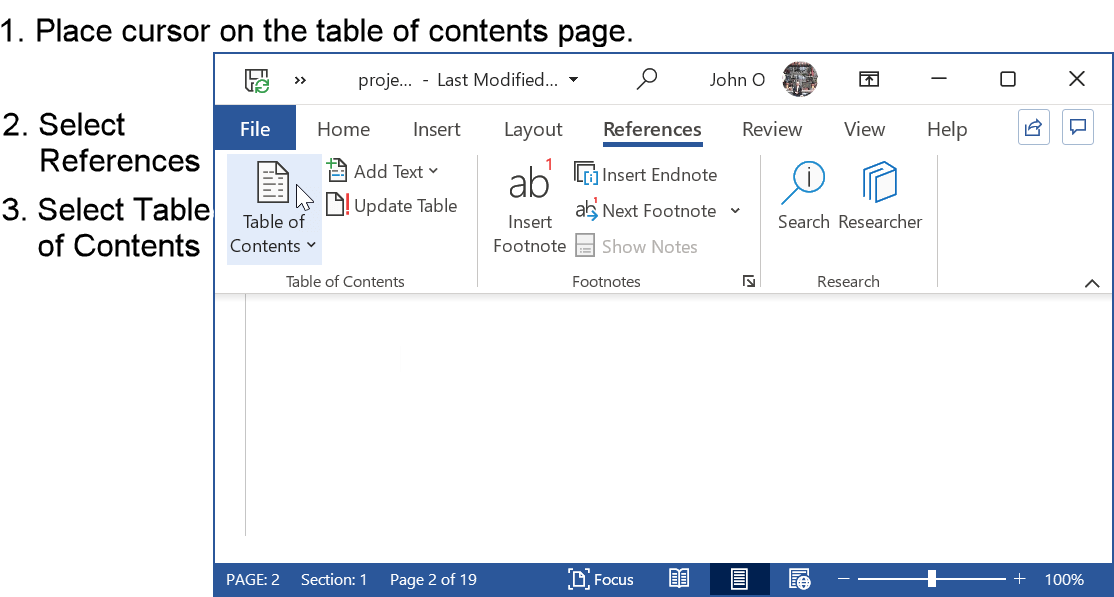 Figure 7: Open Table of Contents Dialog Box
Figure 7 instructions (if required) are:
- Select the References tab from the main menu.
- Select the Table of Contents in the Table of Contents group.
A dialog box with the table of contents options will appear (see Figure 8).
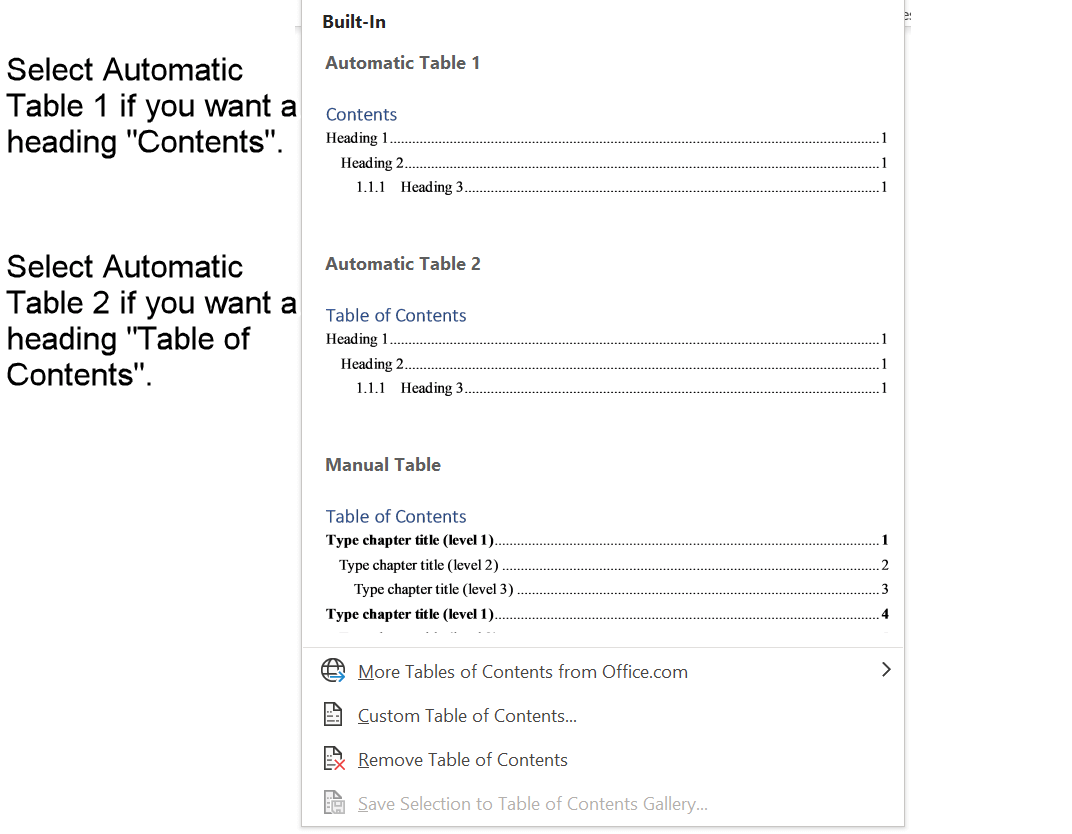 Figure 8: Select Table of Contents Heading
Figure 8 instructions (if required) are:
- Select Automatic Table 1 for the heading "Contents".
- Select Automatic Table 2 for the heading "Table of Contents".
The heading is the only difference between the two options.
Update the Table of Contents
If the last thing you do before you submit your paper is to create a table of contents, then you do not need to update the table of contents.
However, you must update your table of contents if you add, change or delete a heading.
You should also update your table of contents if you add, change, or delete text or figures because page numbers may change.
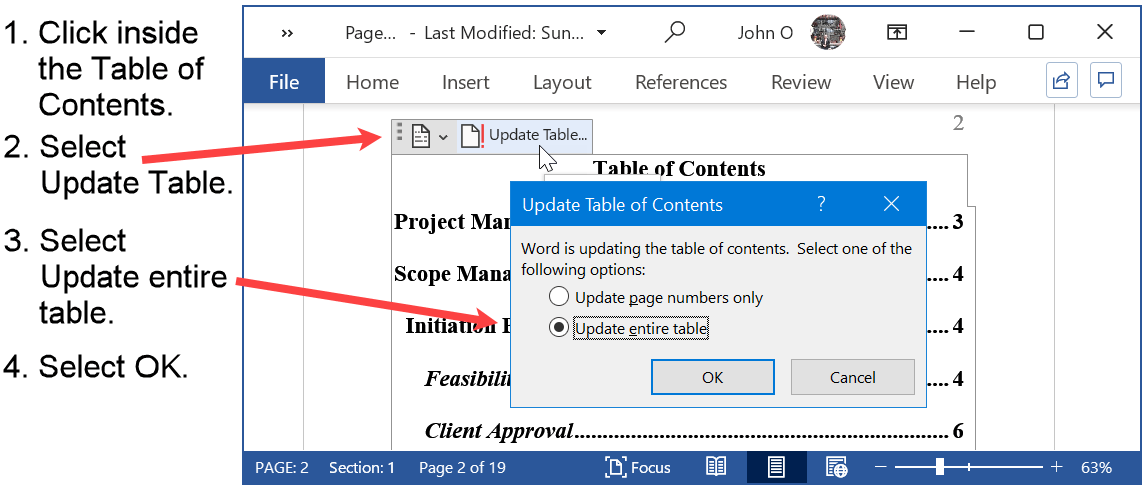 Figure 9:Table of Contents Update in Microsoft Word
Figure 9 instructions (if required) are:
- Click anywhere inside the table of contents.
- Select Update Table.
The Update Table of Contents dialog box will appear. - Select Update entire table.
Summary
To create a table of contents where page numbering begins after the table of contents, you should (as shown above):
- Create a new section after the table of contents.
- Break the link between the section that contains the table of contents and the following pages.
- Make sure there are no page numbers on the table of contents and preceding pages.
- Assign Microsoft Word Outline levels to each of your headings that are to appear in the table of contents.
- Create the table of contents, either during the writing process, or at the end.
- Update the table of contents as you add, change, or delete headings and text.
- See this Microsoft page (opens new window) for more information about creating a table of contents.
Like This Page? Please Share It.