- Home
- Table of Contents
- Manual Table of Contents
How to Create a Manual Table of Contents in a Word Document
Why would you want to create a manual table of contents in a Word document?
Microsoft Word is very good at automatically creating a table of contents for you. And it is easy to update the entries and page numbers.
Microsoft Word places the headings of your document in the table of contents. These headings have a level number from 1 to 5.
I would use the automatic table of contents wherever possible and leave the update of page numbers to Microsoft Word.
But what if you want something different from the heading in the table of contents?
The following are examples of such differences:
- You want a shorter version of the heading in the table of contents entry.
- You want to provide additional information in the table of contents such as a summary of that section. This is sometimes called an "annotated table of contents".
- You want to enhance the visual appeal of a table of contents by adding an icon or symbol to the table of contents entry.
You can do this by placing the entries and page numbers in the manual table of contents template provided by Microsoft Word.
There may be a workaround that enables you to use the automatic table of contents in certain situations.
One such workaround is when a shorter version of the heading is used in the table of contents - see using the style separator.
Another workaround is to use a table of contents entry field to add an annotation.
Example of a Manual Table of Contents in a Word Document
Figure 1 shows an extract with a Level 1 heading (Anne Boleyn...) and three level 2 subheadings (Courtship and Marriage..., Anne Boleyn's Influence...., The Downfall...).
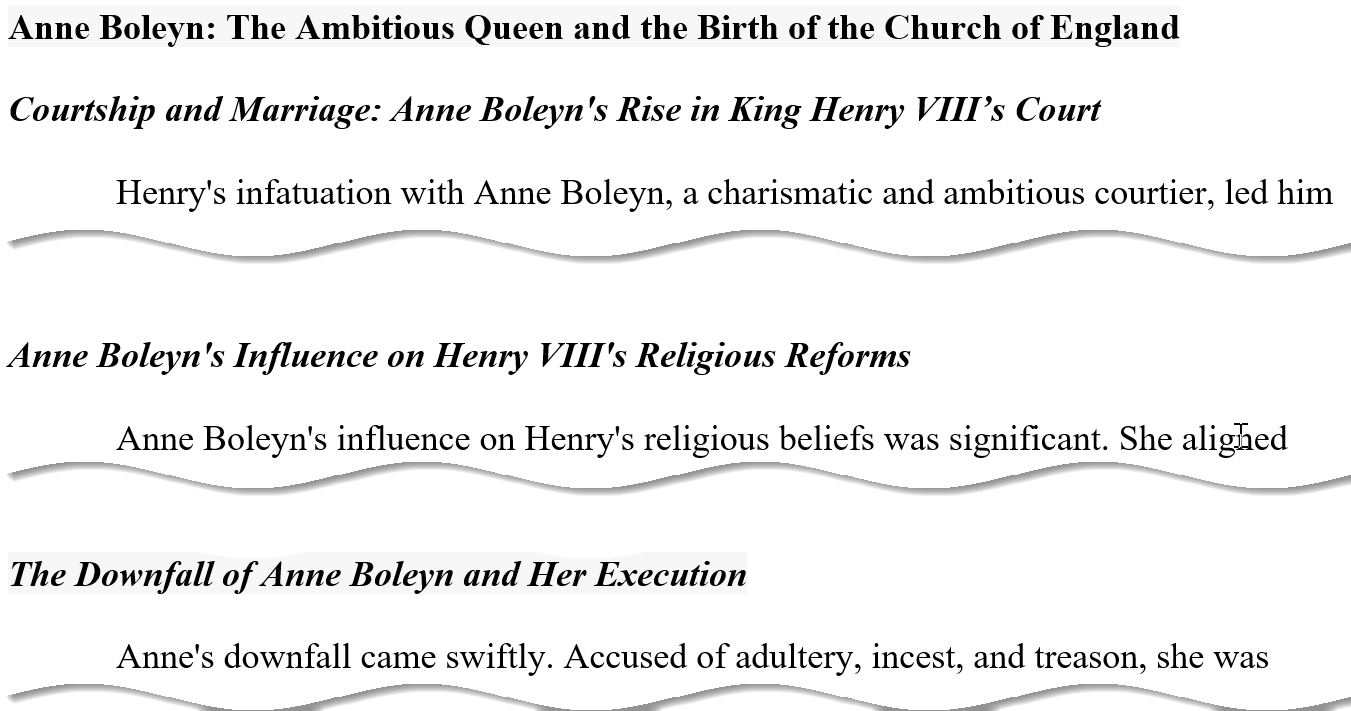 Figure 1: Level 1 heading and 3 Level 2 Subheadings
Figure 2 shows the corresponding entries in a table of contents that have been automatically generated by Microsoft Word.
Note that the table of content entries are the same as the headings in the document.
 Figure 2: Table of Contents Extract That Has Been Automatically Generated by Microsoft Word
Figure 3 shows the corresponding entries in a table of contents that have been manually entered in the Word document.
Note that the table of content entries are different to the headings in the document. They are an abbreviation of the headings.
 Figure 3: Abbreviated Entries in a Manual Table of Contents
How to Insert a Manual Table of Contents in a Word Document.
Microsoft Word provides a template, and you fill it in. As simple as that!
Figure 4 shows how to insert a manual table of contents in a Word document.
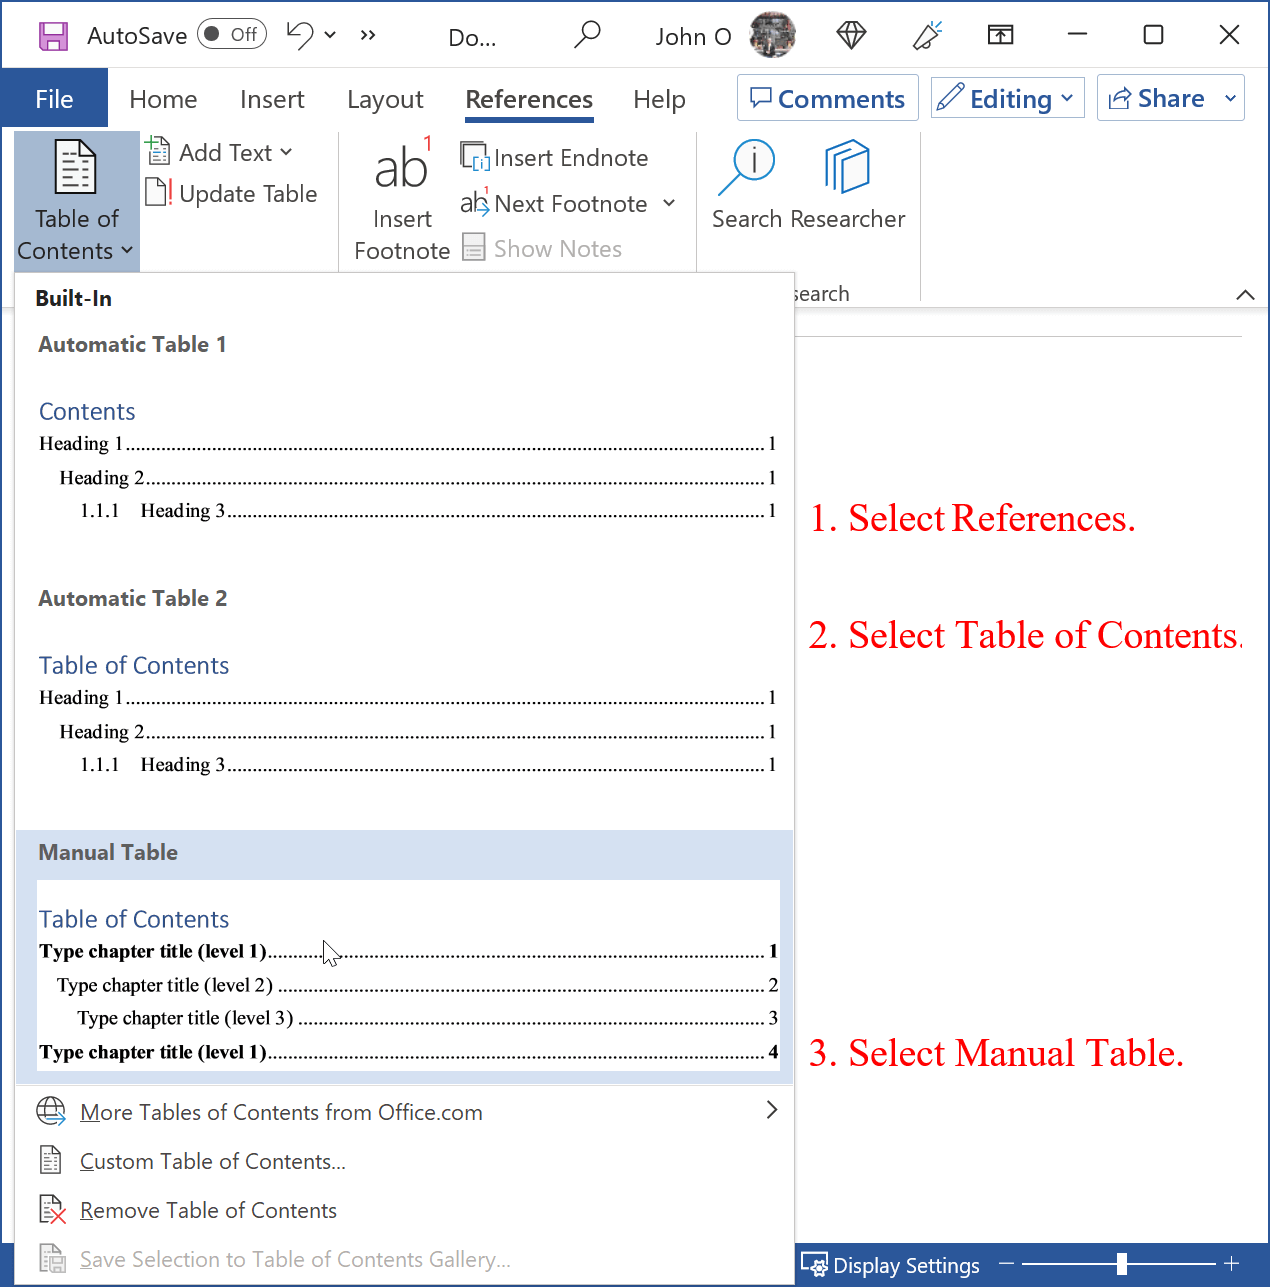 Figure 4: Insert a Manual Table of Contents
Figure 4 instructions are as follows:
- Select the References tab.
- Select Table of Contents in the Table of Contents group.
- Select Manual Table.
Figure 5 shows the table of contents template that is inserted into the Word document.
 Figure 5: Manual Table of Contents Template in a Word Document
Format the Manual Table of Contents
If you want to format the table of contents differently to the default, then:
- Click inside the table of contents. This will display the Content Control box.
- Select the three vertical dots (see Figure 6).
The contents will be selected. - Format as you want.
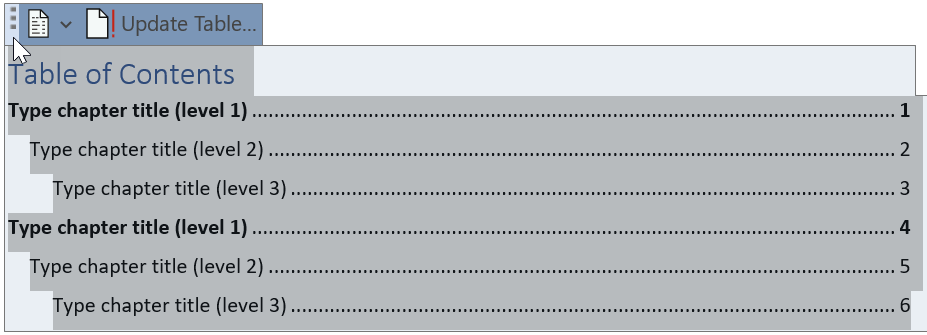 Figure 6: Content Control for the Manual Table of Contents
For example, if writing in APA format, you would:
- Set the font and size to the same as the rest of the document (e.g., Times New Roman, size 12).
- Set the line spacing to double.
- Remove any bolded characters.
Figure 7 shows the formatted manual table of contents in a Word document.
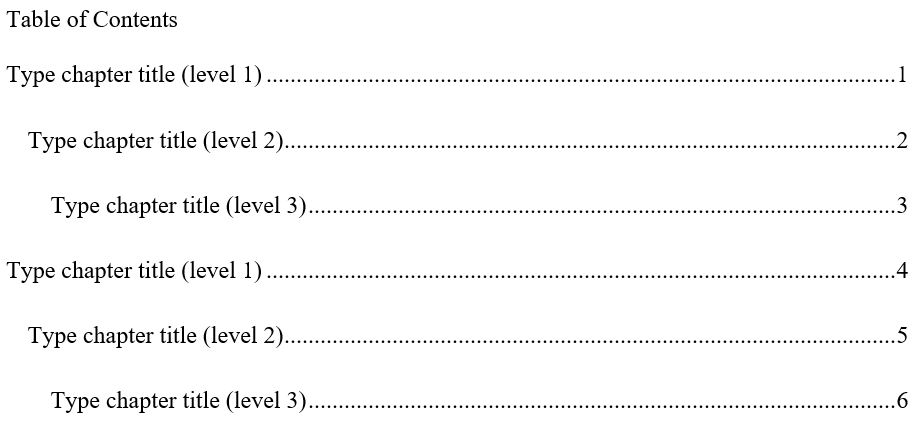 Figure 7: Manual Table of Contents Template in APA Format
Creating Entries in the Manual Table of Contents
You can overwrite the template entries as follows (see Figure 8):
- Move the cursor over the template entry.
- Left click (or equivalent) to select the template entry.
- Type in the entry you want in the table of contents.
- Select and enter the page number.
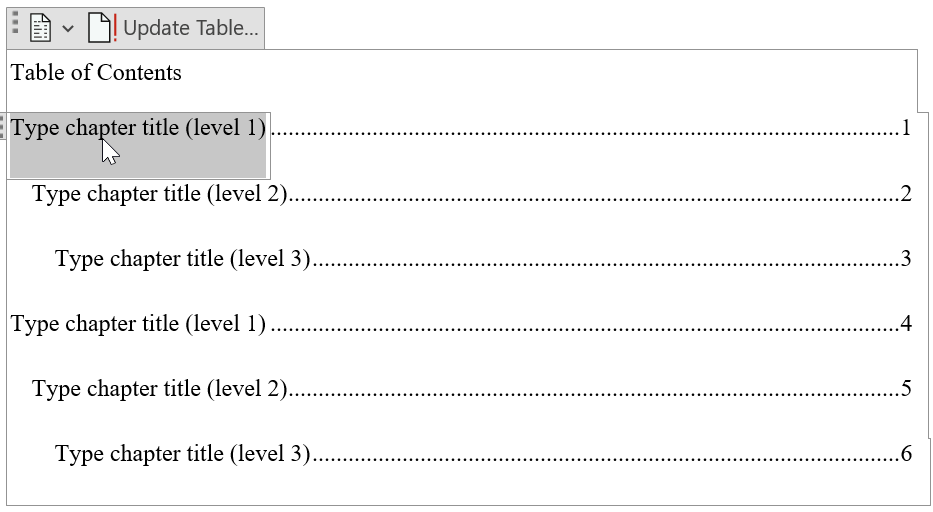 Figure 8: Manual Table of Contents Entry
You may have more headings and subheadings than allowed for in the template. You then need to copy and paste the entries into the required position.
Copy an Existing Entry
Copy an existing entry as follows:
- Move the cursor to the left of an existing entry to copy. Make sure the cursor is to the left of the Table of Contents (see Figure 9).
- Left click (or equivalent) to select the entry.
- Copy the entry (Ctrl+C).
- Move the cursor to the right of the entry. Press Enter to create a blank line.
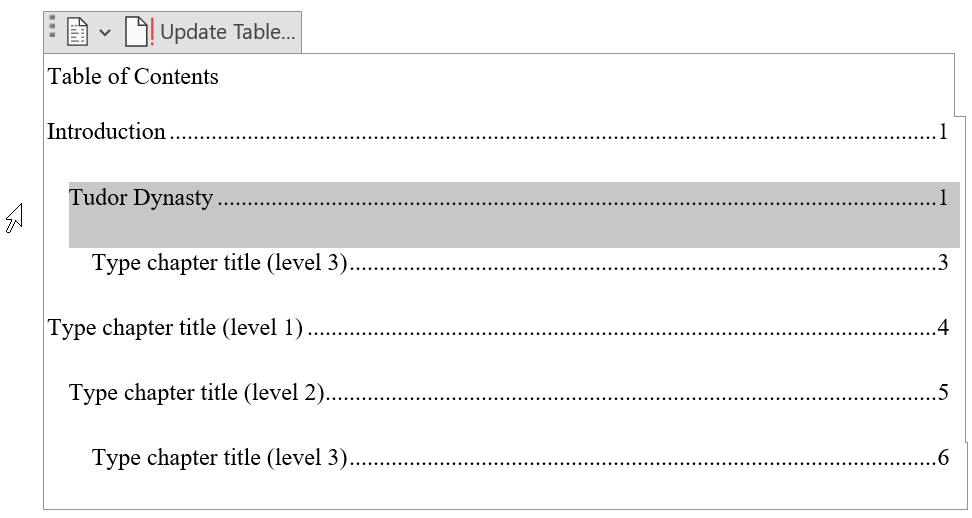 Figure 9: Copy an Entry in a Manual Table of Contents
- Place the cursor on the blank line (see Figure 10).
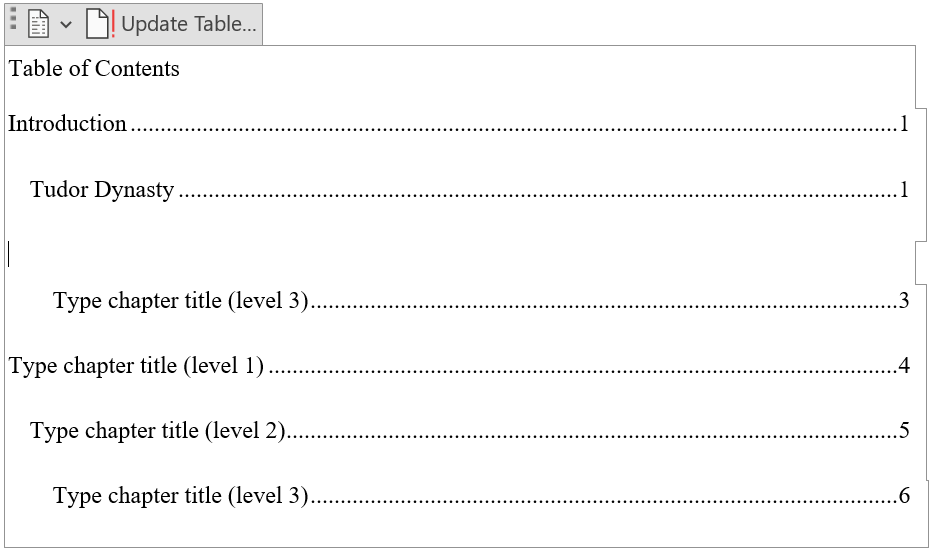 Figure 10: Blank Line in the Table of Contents
- Paste the previous entry into the blank line (see Figure 11).
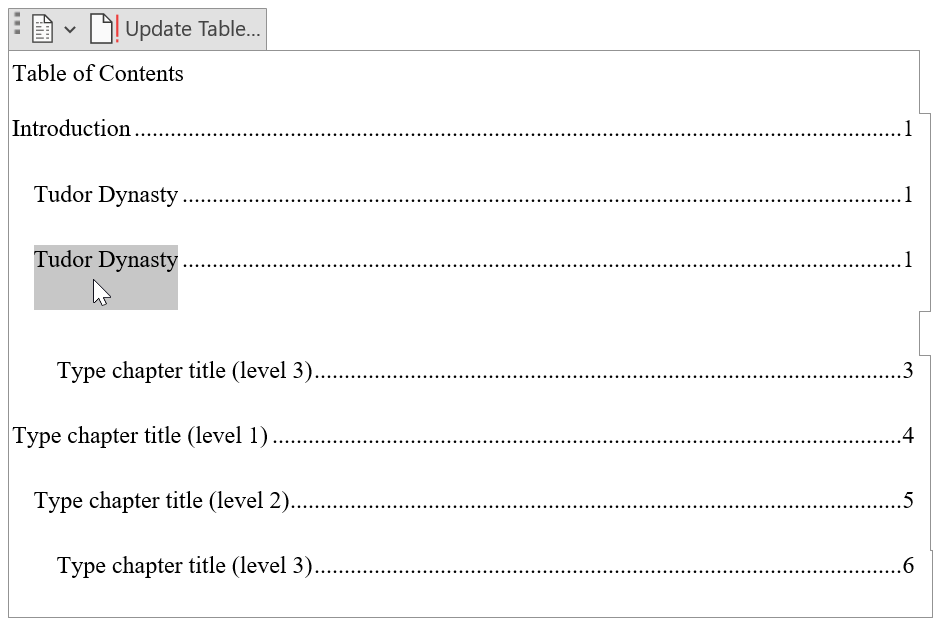 Figure 11: Duplicate Entry Pasted Into the Table of Contents
- Enter the hew entry (see Figure 12).
- Enter the page number
- Delete any extra blank lines
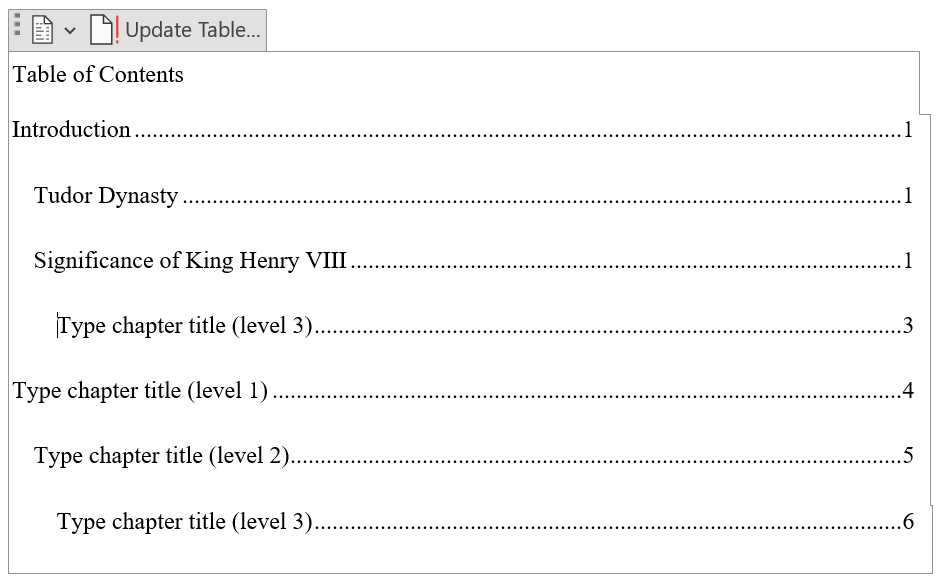 Figure 12: Completed Entry in a Manual Table of Contents
Abbreviated Entries in an Automatically Generated Table of Contents
It is possible to abbreviate Level 1, 2 and 3 headings in a table of contents using the automatically generated table of contents feature in Microsoft Word.
To do so, you may have to slightly reword or reorder your heading.
This can be achieved by using the Style Separator (Ctrl+Alt+Enter). This allows you to have different styles in a heading or paragraph.
A Style Separator (Ctrl+Alt+Enter) is inserted before a paragraph marker. The paragraph marker is converted to a style separator.
Consider the Level 2 Heading in a Word document shown in Figure 13.
Suppose you want to keep the heading but only have "Anne Boleyn" in the Table of Contents. You need to keep the first part (Anne Boleyn) as Level 2, and the remainder as the Normal style.
- Insert a paragraph marker (press the enter key) after "Anne Boyleyn" (see Figure 14).
 Figure 14: Location of Style Separator
- Place the cursor anywhere in the paragraph that is to be the table of contents entry, for example, "Anne Boleyn".
- Press the Ctrl+Alt+Enter keys.
This will convert the paragraph marker to a style separator (see Figure 15).
- Select the text after the style separator
- Change the style to Normal.
This text will not appear in the table of contents entry - Format this text to be match the heading, for example bold and Times New Roman size 12. However, this part will not have a level number - it will have the Normal style.
- Update the table of contents.
Figure 17 shows the abbreviated headings in the table of contents and the actual headings in the document.
 Figure 17: Abbreviated Entries and the Corresponding Headings
How to Create an Annotated Table of Contents
An annotated table of contents entry contains some additional text such as a summary.
You could create a manual table of contents in a Word document and insert the annotations.
However, it is possible to insert annotations into a table of contents that has been automatically generated.
Figure 18 shows an annotated entry in a table of contents automatically generated by Microsoft Word. The entry is "Marriages and Divorces" which is on page 6. A brief description ("this section explores...") follows. This description does not appear in the main text.
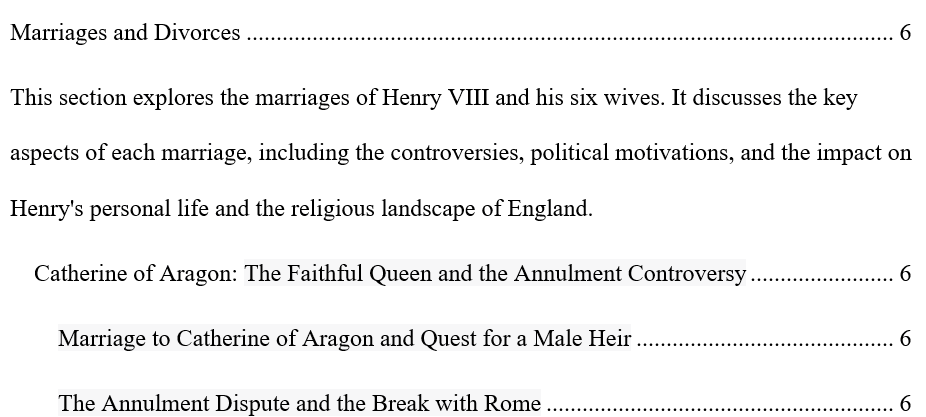 Figure 18: An Annotated Entry in a Table of Contents
Two phases are required to enter annotations in a Microsoft Word automatically generated table of contents. They are:
- Set up the table of contents to accept field entries. This is done once only for the table of contents.
- Enter the annotation(s).
Set Up the Table of Contents
- Select the References tab (see Figure 19).
- Select the Table of Contents icon in the Table of Contents group
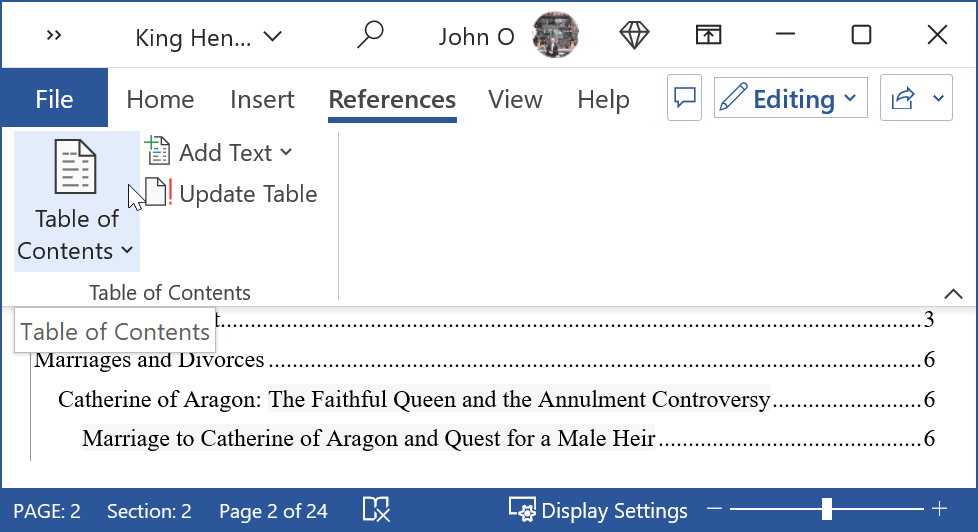 Figure 19: Open the Table of Contents Submenu
- Select the Custom Table of Contents option (see Figure 20).
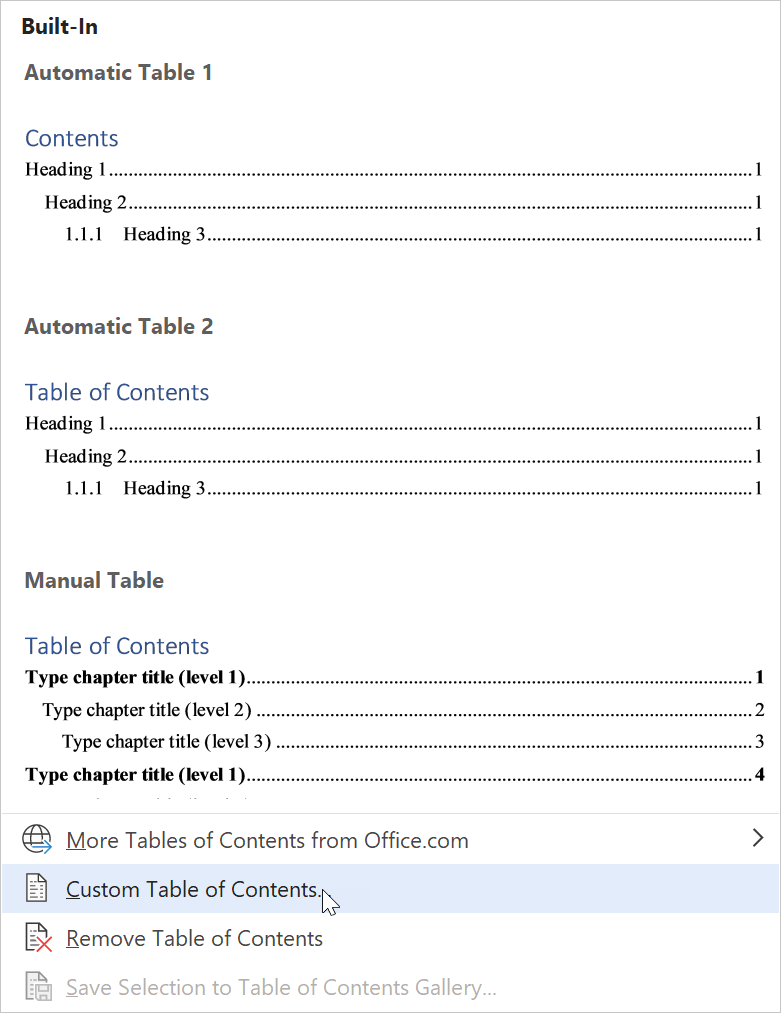 Figure 20: Select option to customize the table of contents
- Select Options (see Figure 21).
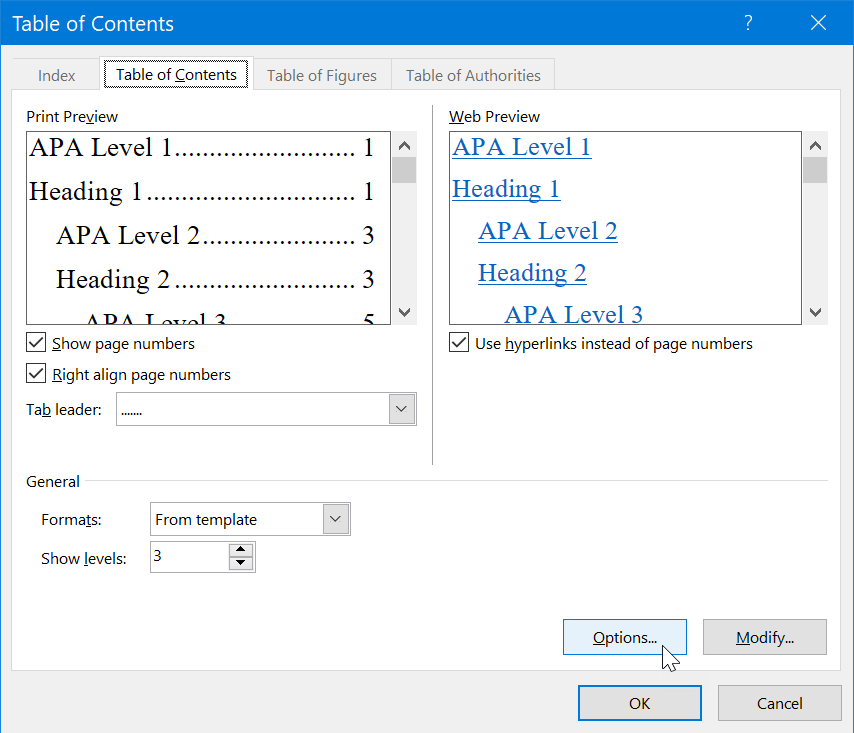 Table 21: Choose to Modify the Table of Contents
- Check the Table entry fields box (see Figure 22).
Leave any other fields as they are.
Note: Your style names may be different. The TOC levels should be 1, 2 and 3.
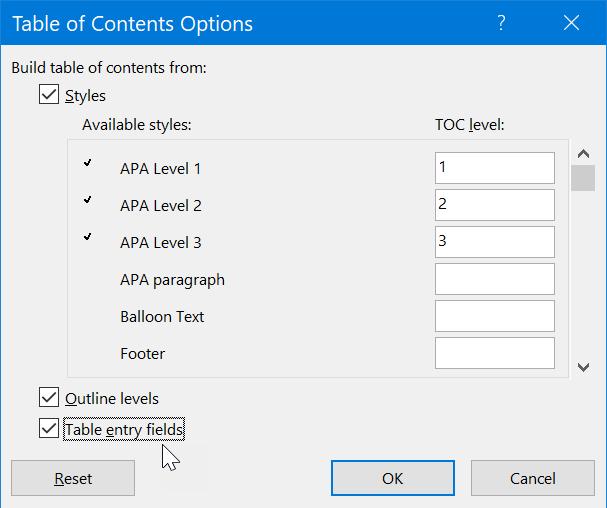 Figure 22: Microsoft Word Fields to be Included in the Table of Contents
- Select OK (twice to close the table of contents dialog boxes.
The table of contents will now accept the TC field as an entry in the table of contents.
You will now be inserting the annotation into the TC field.
Insert the Annotation
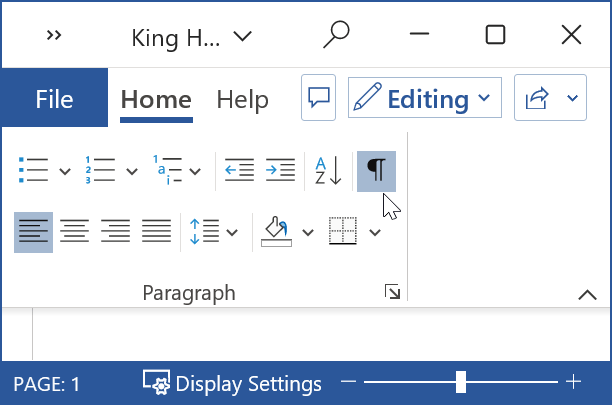 Figure 23: Show/Hide Button
If you haven't done so, turn on the Show/Hide button in the Paragraph group in the Home tab.
You can then see the field with the annotation in the actual text.
The annotation will not appear in the document (but will in the table of contents) when you turn the Show/Hide button off.
- Place the cursor at the end of the heading that will have the annotation added (see Figure 24).
Make sure the cursor is before the Show/Hide marker.
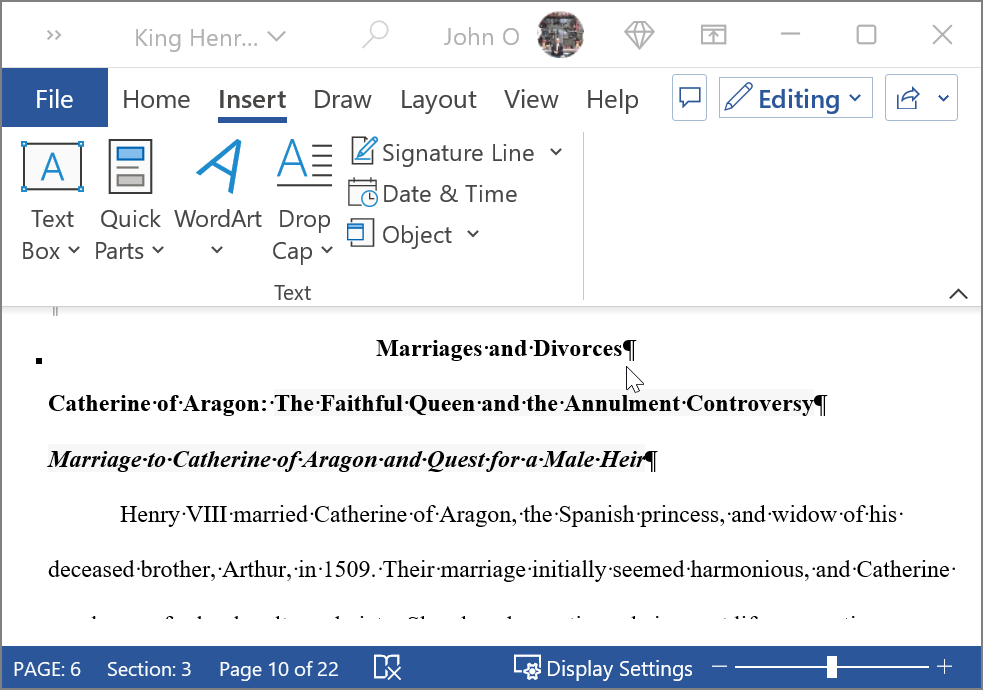 Figure 24: Annotated Field Entry Position Selected
- Select the Insert tab (see Figure 25).
- Select Quick Parts in the Text group.
- Select Field.
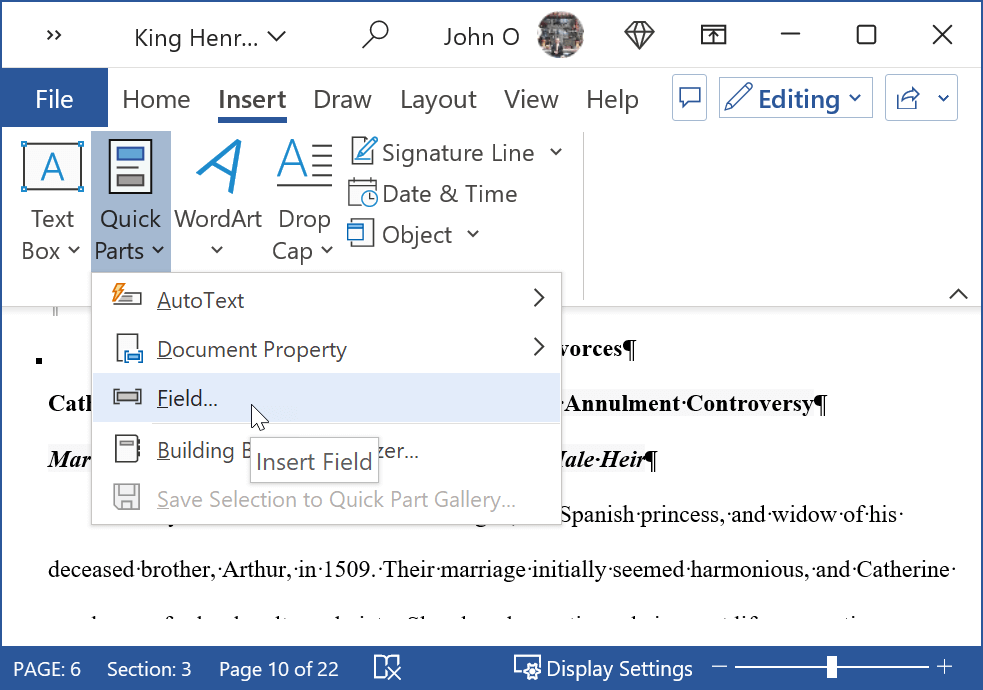 Figure 25: Open the Field Dialog Box
- Select TC in the list of fields presented (see Figure 26).
This is the field for an entry in the table of contents. - Copy and paste (or type) your annotation into the Text entry box.
You can enter more text than the size of the box. - Complete the field options:
Select TC entry in doc with multiple tables.
Select Outline level.
Enter a level number, for example 3.
Select Suppresses page number. - Select OK.
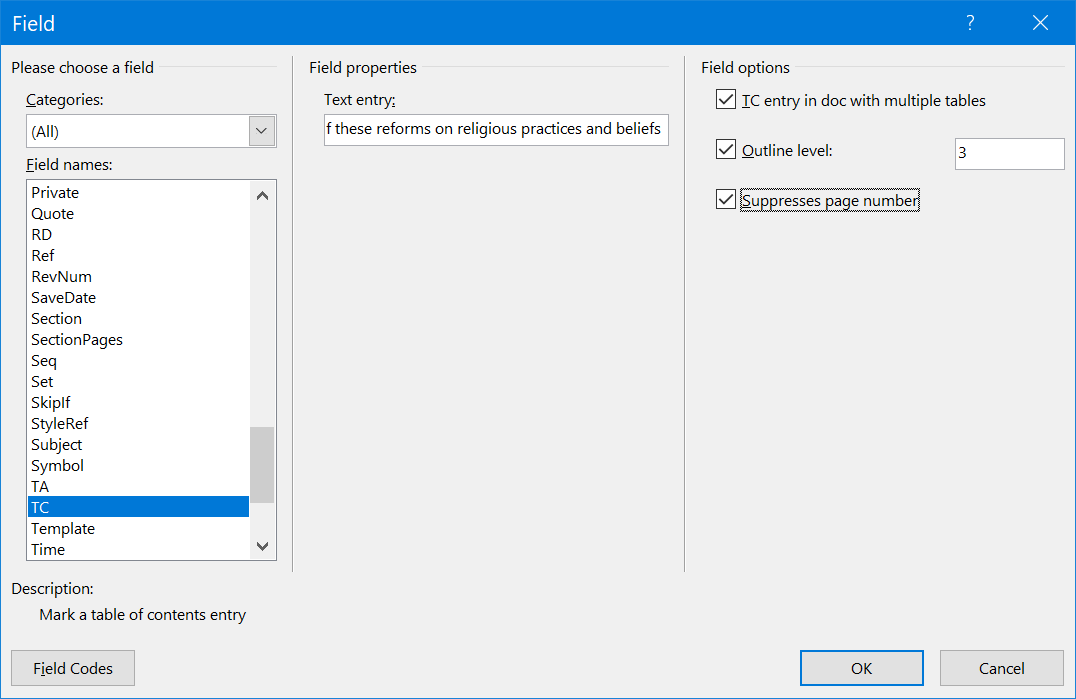 Figure 26: Table of Contents Entry Field Details
The annotation has been placed next to the heading that you indicated (see Figure 24).
Note that you can see the field code {TC...} in the document (see Figure 27). This occurs when the Show/Hide Toggle is on. When you turn it off, the field code disappears. However, the entry will be in the table of contents underneath the heading as shown in Figure 18.
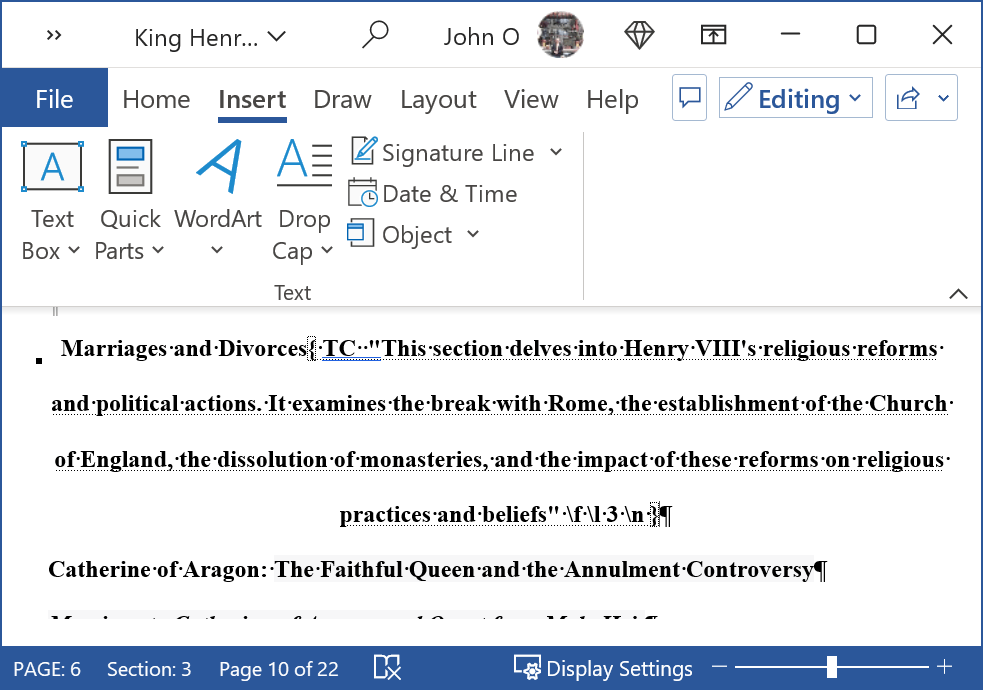 Figure 27: Field Code Next to the Heading
Turn the Show/Hide button off. The TC code will not be displayed in the document.
The annotation will be displayed in the table of contents.
Summary
A manual table of contents can be easily created as shown above.
However, this should rarely be necessary. Create the table of contents automatically wherever possible. This is the easiest way of keeping the entries such as page numbers up to date.
This Microsoft page tells you about the difference between updating a manual table of contents and an automatic one in a Word document.
If you are thinking of creating a manual table of contents in a Word document, first consider if there is a way of using the automatic table of contents feature provided by Microsoft Word.
Like This Page? Please Share It.